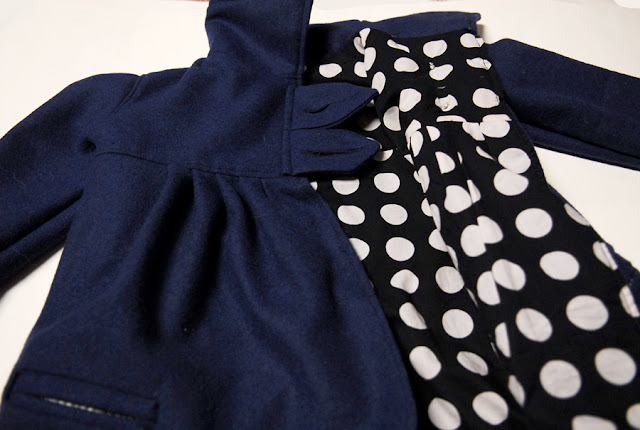
Ok you all know I love versatility, and mixing things up. So while I was working on Abbey's winter jacket, I decided to make one using the Abbey Jacket Pattern I made a few alterations. I used wool this go around and lined the coat for extra warmth. Because I love the Abbey Jacket, but our winters get a little too cold for just fleece.
The extra flounce in front allows for extra coverage and warmth, while maintaing the ease of a swing coat.
And I love the lining which is a fun little "pop"
So if you have the Abbey Jacket Pattern I will show you a few changes you can make to get a different jacket.
To start I decided that I only wanted the front to be two pieces (instead of three like the Abbey Jacket) SO I taped Front A and B together so they were the same height as the piece Back A. Then I cut the pieces out as the instructions state.
The only other change I made to the pattern was when I was cutting the Front C piece I added a few inches to the width which would make the front nice and full.
I cut the pattern out of the wool and then the same pieces out of the lining (except the collar which I only cut out the wool, I just cut two of each)
Keep in mind I used a cotton for my lining which was thin so I left the size the same as I used for the Abbey Jacket, however if you were using a heavier fabric you may want to go up a size or make certain areas larger like a lower underarm.
Then when sewing the jacket together you will basically follow the directions of the pattern only you will pleat the Front C piece to the top front piece so they become the same size.
Then your front pieces will look something like this.
The other thing I changed is I added pockets to the front of the jacket to help keep her little hands warm. I made a welt style pocket. To do this it is almost like making a very large bound button hole. Start with a rectangle that is wider and taller than the pocket size you want. Pin it to the front of the jacket where you want the pocket to be. (I made mine quiet low so it was at her hand height you can put it wherever) Then draw the size you want your pocket to be in a rectangle on the piece you pinned to the front.
Then you will sew along the rectangle and cut a slit down the middle angling into the corners.
Then for better instructions on how you turn the rectangle to the back and sew the flaps check HERE. (it is much more clear than the pocket pictures turned out)
Now you will grab a piece of fabric that is twice the length of the pocket size you want. You will sew one edge to the bottom of the flap. (don't sew it to the front of the jacket just to the flap.)
Then fold the fabric up and sew it to the top flap. (again not the front of the jacket just the flap) Then sew up the sides of the pocket. I didn't worry about the raw edges or how it looked because the lining would cover it up.
Then you have a pocket. (see a lot like a bound button hole right?)
Finish the assembly of the jacket as per the instructions, getting the sleeves and collars on and sewing up the side seams.
Do the same for your lining piece (sorry for the horrible picture, my battery died so I used my phone)
Then sew the collar lining right sides together and turn it right side out.
Next and I know this is not the best picture but this was hard to show properly. You will sew the lining to the jacket. You want to line the right sides up together sewing the collar and neckline to each other and sewing along the edges leaving an opening along one edge to turn the jacket right side out.
Then turn the jacket pieces right side out and fold under the part that was left un-sewn. Then I made little tabs for the front instead of the long tabs from the pattern.
I added button holes to the flaps.
Add some buttons and you are done. A sweet new winter jacket. I have to say, wool is pricey but worth every penny I love this jacket.
I especially love when I see the lining peaking out.
And I really love the high collar to keep her neck nice and toasty from the blistery winds.
Oh and what's not to love about the fullness to the front.
Incase you are wondering, larger sizes of the pattern are coming.
Girls sizes 5-10 will hopefully be release on Saturday so stay tuned for that :)


No comments:
Post a Comment