I LOVE fall! It is my absolute favorite season! I love the fall colors the crisp cool air, the smell of cinnamon, apples, nutmeg, ginger and pumpkin goodies baking away in the kitchen. Oh and snow is coming! Maybe its from growing up in MN but I LOVE snow! (just not driving in it) Although I am quite certain that my shwin counterpart who also grew up in MN much prefers her desert climate. So in building my daughter's fall and winter wardrobe I knew I had to make a super comfy tunic.
While browsing fabrics at Jo-ann's I came across this super comfy southwest print. The best news? It's a super stretchy and ultra soft knit! Well I just new I had to get it and that it would make the most comfortable square tunic ever. I think I may just make one for myself in the coming weeks. I used some knit I had around for the tap part just to mix it up a bit. So if you want to make one as well its really easy. (and you can mix any fabrics you want)
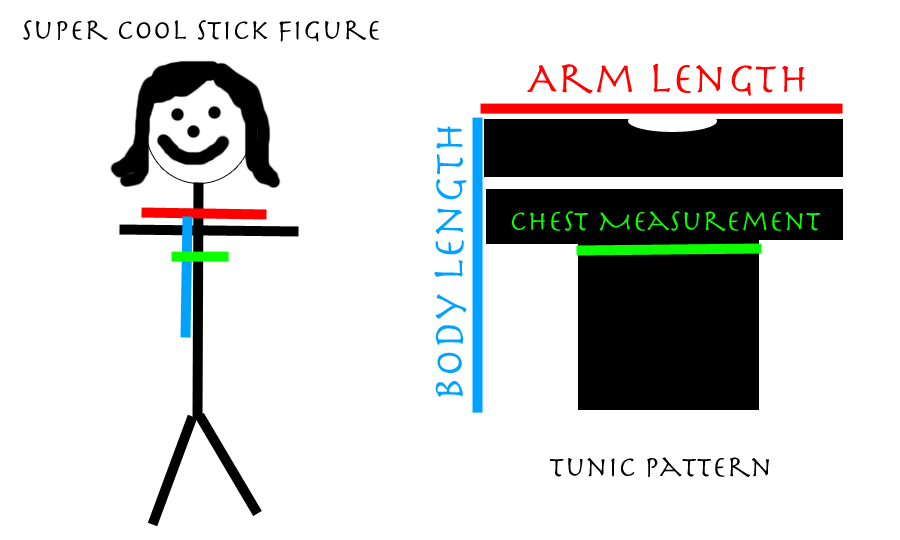
I have made this same tunic shape several times I just love it. It's super easy to make and there is really no need for a pattern just a few measurements.
It is made a lot like
this one and
this one but incase you are still unsure on the instructions, I made a really (hopefully) simple diagram. (let's all take a moment to laugh at my "drawing" ability) Ok so there are 3 measurements you will need.
1.With the arms stretched out wide measure from one arm where you want the sleeve to land across to the same place on the other arm. Add length for hemming the sleeve and this is your width for the top.
2.Next you will want to measure the widest part of the chest then I usually add about 2-3 inches so it is a little loose.
3. Next measure from the top of the shoulder to where you want the tunic to end, add length for hemming.
Ok so those are the 3 measurement you will need, now you are going to make a large rectangle with a fold up at the top (where the neck is) the width should be measurement #1 and the length will be measurement #3 Then determine how wide you want the sleeves to be. I usually make them nice and wide, just remember the front is only half the width of the sleeve. Then once you determined the sleeve width you will cut in the sides so the lower part of the rectangle is the width of measurement #2. You will have what looks like a big square shirt.
For this one I cut the top part out of one kind of fabric (with the fold on top) and the lower part out of another fabric. (no fold)
Now with the top part folded on the top and folded width wise. You want to cut the neck opening.
Then when you unfold it width wise and you will see the neckline.
Here is the top and bottom pieces together (folded width wise)
Then with right sides together sew the bottom pieces to the top piece.
Next I cut a strip from the same grey I used for the top part and made a ribbing. Sew a strip together to make a tube that will stretch over the head.
Then fold it in half and sew it right sides together to the neckline. If you need help with this technique
go here Then with the tunic turned inside out so the right sides are together sew the sleeve to the armpit and down the side.
Next I made a cuff for the sleeves. You see I love a nice wide sleeve but for my little girl the sleeve can get in the way of everything and really messy when she eats. (you know kids) So to solve this problem while adding a little detail to the top I made a cuff by sewing a strip that makes it around her wrist and sewing it together and then folding it in half. (just like you did with the neck ribbing only smaller)
Then I added two pleats to the sleeve so that is fit the width of the cuff. With right sides together sew the cuff to the sleeve.
Then you have a nice little sleeve with pleats in it.
Next I added some flower petals cut out of felt with a button in the middle just for something extra. I also added some stitching along the neckline.
And there you have it a super comfy square tunic.
Perfect for all of your fall lounging needs.


No comments:
Post a Comment