Saturday, July 30, 2011

Project Runway: Come as you are

Ok let's face it if you have been around the blog for awhile it is no secret that I LOVE project runway. If you sew chances are you do to. Last season I made a slew of projects that were inspired by the designs of Project Runway and then of course we had our first ever Project Toddler Runway competition. (which was a blast and may be revisited here soon :) This year along with projects inspired by the designs, I thought I would do my own little recap. I mean who doesn't love talking about project runway? Besides my husband who rolled his eyes when I got all giddy with excitement over it being back on... So I am breaking it down very simply.
The winner
The looser
My favorites
and one left for What the Heck???
All pictures are courteous of Lifetime and you can hop over and watch the first episode if you haven't seen it already. 

 The winner this week was Bert! I say woohoo! I really wanted to see him come up with something amazing since he worked with some amazing designers back in the day, and I loved his dress. From the very first moment his boxers were draped up on the dress form I knew I would love his dress. His styling I agree needs some work but he totally deserved the win I love this! Totally inspired me in so many ways!
 The looser this week was Rafael. I have to say I am not sure his was the worst ever, but it was bad. The judges ripped him a new one for that necklace, I have never been a fan of bib necklaces. (which I guess are out according to the judges) but this one did throw the outfit off. I feel like he added it just to please Tim and he may have stayed ugly pants and all if he left the necklace out. The pants are just ill fitting which says a lot for these skinny little models that should be able to wear anything. Maybe a longer top would have helped?

 Ok now for the I loved it. Anya created this look which was pretty great considering she just learned to sew a few months back. The top is pretty even though most of the details seemed to come from the night dress, but the pants? They blew me away they fit like I dream I love the color, the fit, the style. Who knew a white bed sheet could look so good. She did a great job with them!
 Next up was Bryce. He was safe this week not in the top or bottom but for some reason his was one of my favorites on the runway. Everyone had really short skirts it seemed. (this one as well) However this one at least looked classy up and down the runway, and I loved that it was balanced with such a full and long sleeved top. I love the billowing sleeves, grey color, and peekaboo shoulder.
Lastly the What the Heck?? I mean really this wasn't even the bottom two? My favorite is when Christina Ricci pointed out that she could have dyed the fabric or manipulated it somehow to look classy. I totally agree I mean My PJ's would not be much better but come on what was Julie thinking with this? The pants where all weird at the waist almost like she safety pinned them on and the shirt is just awful. The other two in the bottom with her at least showed some creativity in the design.

So what did you think? Should we have a "make something out of our PJ" party? Where you inspired by any of the designs? Do you think they choose the right winner and looser?

Friday, July 29, 2011

Oh Pintrest How I Love Thee....

I love pintrest. I could spend hours on pintrest getting some inspiration, or spend hours pinning stuff to my board. Right now I love pintrest the most because summer has been calling my name. I have spent my days playing outside with my kids, picking apricots by the hundreds and making Jam, and a million other things, and getting ready for our vacation coming up the last getaway before Jude starts school. (don't get me started I may cry... although it is only preschool he is just growing up so fast) So I turn to pintrest....


To get inspired to make something for myself


To make something for my family room (which still needs a lot of help)


To learn how to knit. I absolutely LOVE this blanket.


Source: gap.com via Shauna on Pinterest

To get these awesome shoes for Jude so he can start school with style and the confidence of a super hero :)


And Just to laugh since we all need that.
Have a great weekend! See you back here Monday with some fun projects :)

Thursday, July 28, 2011

70's doorbell facelift

 Today I have kind of an odd project to share with you. In fact I feel fairly certain that none of you will have the doorbell that we have in this house. But maybe sharing this will inspire you to think out of the box and give something old new life. 
 You see we have this old 70's doorbell. Yeah it's sweet you are all jealous I know. You see my answer was simple replace it. Putting in a new doorbell can't be that hard. My husband loves it. I mean seriously loves it. We are talking old school bell chimes every time the doorbell rings.I have to admit I don't hate the sound, but the look? It's a little too 70's for me. So I thought I would give it a fresh look and help it to blend in a little. 
 So I took down the box and removed the old fabric. 
 I cut out a new piece of fabric something clean and simple. Then I spray painted the box with a nice coat of fresh grey. Then bells got a coat of white spray paint. 
 And now the doorbell fits in a little more. It looks as if it could actually belong in this decade.
And it no longer sticks out like a sore thumb. So if you have something that you want to get rid of think outside the box first maybe you can just revamp it a bit. 

Tuesday, July 26, 2011

Eagle Henley

 I love making stuff for my boy. He is very complimentary and he offers a lot of input and he loves sitting next to me as I make it watching every step. (which is a little more common these days since he does less napping and more coloring next to me as I craft.) We both decided he needed a few additions to his summer wardrobe, especially since he thinks wearing long sleeve tees is ok. We started with a simple henley. 
 It's also a great upcycle project created from an old men's polo. Simple, quick and easy. Let's get started shall we?


 I started with this men's large polo pulled from my stash. 
 Then I cut the collar of cutting right down to the collar lining. Since most polos are jersey it won't unravel. so just cut it nice and neat and you are good to go. 
 Then you have a nice collarless shirt. 
 Then fold the shirt in half and using a shirt that currently fits as your guide. Cut out around it. 
 Then you should have a front and back piece. Also cut out the sleeves. I use the original hem of the sleeve so it saves me sewing time later. 
 Next I made a patch for the shirt. I did this by finding a silhouette I wanted and printed that out as my stencil. Then I cut out my patch using jersey knit with interfacing ironed on the back. This makes it so the patch won't stretch and then because it is jersey knit it won't unravel. Jude wanted an eagle we made an eagle and I thought adding some numbers almost like a metal plate, would spiff it up a bit so I asked him his favorite number and used my fabric markers to draw it on. 
 Then I did a satin stitch around the edge of the patch sewing it to the shirt. I added a few stitches with embroidery floss to accent. 
 Then with right sides together sew the front and back pieces together at the shoulder. 
 Then attach the sleeves in the sides with the right sides together. 
 Then sew from the end of the sleeve to the arm pit turn and sew down the side. Hem the bottom and you could be done. 
 I say could be only because the placket on this particular polo was really thick and heavy (many layers of fabric) it is fine for a grown man but it was a bit much for Jude. So I cut out the old placket using my seam ripper and made a new one. It was getting a little complicated and I kind of winged it so I didn't do a full tutorial but I could later if you are interested. Basically it is attaching two rectangles that overlap. Then sewing them in place and adding button holes. It solved the problem. 
 Then the top is done and ready to be enjoyed. You know for that summer day treat outside fresh fruit from the tree...
 He loves his shirt, even if he did insist on wearing them with the plaid pocket shorts... it's hard telling a 4 year old stripes and plaid don't go very well, good thing he is cute enough to pull it off...

Monday, July 25, 2011

The Lucy Tunic

 My kids love the Beatles about as much as we do around here. Lately the favorite song has been Lucy in the sky with diamonds. It brings up a lot of interesting questions, or topics of discussion... like what are kaleidoscope eyes? and Jude has spent hours dreaming about how delicious a marshmallow pie would be.The song has been playing on what seems like a loop since as soon as it ends one of the kids runs over to the stereo to hit back and start it all over again. It was where the inspiration for this top initially came from. I wanted something colorful and bright and playful, everything the song is all about. 
 And of course it was the perfect summer outfit to go out and pick some fresh apricots from the tree... (which is as close to a tangerine tree as we will get at least it's the same color) 
 I like the playful billowy shape (which she will likely be able to wear next summer as well) The bright colors and big buttons. I of course went with my favorite color combo blue yellow and white but since you make the stripes yourself the color combo is endless. Oh and making it is really easy :)
Let's get started shall we?


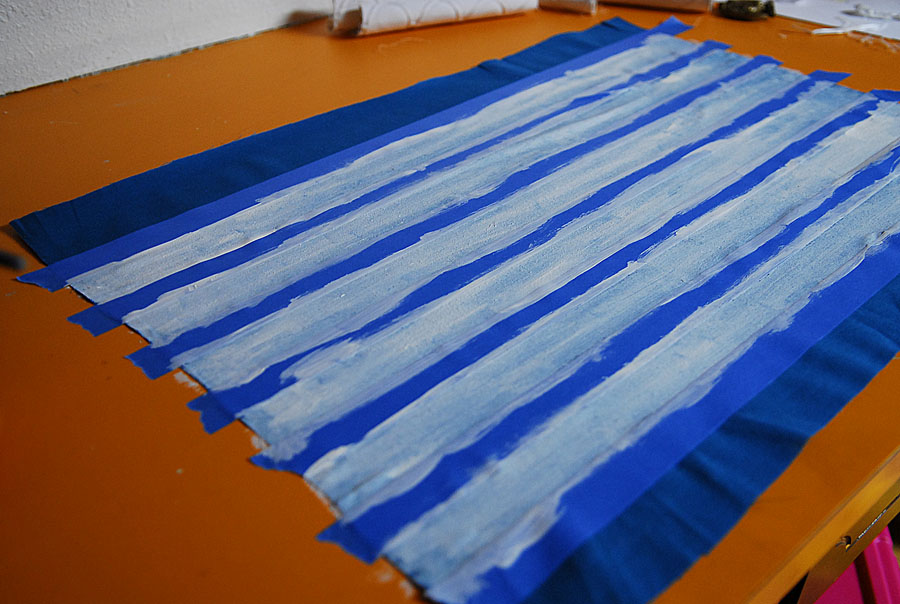
 To start measure from arm to arm to determine the width of the rectangle you will make. (add room for hemming) Then measure from one point on the chest (just under the arm) over the shoulder and to the same place on the back. This is the height of the rectangle and the other measurement is the width. This is your bodice piece. I wanted mince striped but I couldn't find the exact fabric I wanted, since I wanted stripes and solid. So I made my own. I took regular old painters tape (I bet any tape would work) and I taped off straight lines across the rectangle. I just eyeballed it but you could measure to make them perfect. Then I used tulip brand fabric paint and painted the stripes. I used one somewhat thin coat so they would have an almost vintage like feel. Then remove the tape and let it dry.
 I ended up with this. I didn't have enough space on the ends for another full stripe so I left a larger blue section, but whatever you do is up to you. 
 Then fold the rectangle in half length wise and then in half again width wise. 
 Next cut your neck opening. I made mine more of a boat neck shape by making it narrow. 
 When you open it up you should have a nice neck opening right in the middle. Next cut a slit down the middle front of the neck opening. (an inch or two is fine)
 Then fold the top width wise. Lay it on top of some fabric to make the neck lining piece. Cut out the neck opening to match and cut below the slit that you cut. You will also want to cut a slit in the neck lining.
 Then following the neck lining you cut out, make the piece at least an inch thick all around. 
 When laid flat you should have a neck lining piece and the bodice piece. 
 Then fold the bodice piece length wise and angle the sides if you like. I found that I didn't want the skirt to be as wide as the arms so I angled it in a bit. Then you will cut two skirt pieces out a front and back that are the width of the bodice at the bottom and gets a little wider as it goes down. 
 Now for the sewing start my serging or finishing the outer edge of the neck lining piece.
 Then with right sides together sew the neck lining to the bodice piece all along the inside neckline. I put two elastic loop sandwiched between the layers at the neck slit. 
 Then turn the neck lining to the inside and there you should have two elastic loops. Top stitch that edge.
 Next hem the edges of the rectangle that will be the sleeve hem. Then sew the skirt pieces to the bodice front and back.
 Next fold the tunic right sides together and starting at the top of the skirt sew down both sides. Hem the bottom.
 Next I added a little nautical patch I had so the top had more of a nautical feel than a circus feel.
 Lastly sew two buttons to the top for the loops.
 That's all there is to it. Pretty simple right? 
 It can be worn plain as a dress or with a belt like my belt loving little one is liking these days.
 I am not sure there is anything I love more than bold stripes and big buttons...
 Except maybe afternoon wagon rides and apricot picking...
 A favorite pastime for Abbey as well.
She is a girl after my own heart, off to get some more :)