Monday, May 30, 2011

Quiet Weekend...


 It was a pretty quiet weekend around the blog this weekend. We took some much needed time to spend with our families. For my family that meant bringing out the scooter for a few rides around the block (our kids favorite pastime) We had to sneak them in between rain showers. The weather was fairly grim all weekend...
 Abbey liked to pout when it wasn't her turn to "pretend to drive" However both of them still enjoyed the rides. 
 We snuck in some time to play in the sand. 

Then both of us Shwin's spent some time today to think about our brother in the Marines. We appreciate every solider who bravely fights to protect our freedoms, and while we remember those who have lost their lives, we also respect those who continue to fight for us. Happy Memorial Day!

Saturday, May 28, 2011

Terra's Treasures Giveaway!

*Giveaway is now closed*

Do we have a treat for you today? Another fabulous sponsor, with another fabulous giveaway! We welcome Terra's Treasures today.


The shop is amazing, her creations are so unique and full of detail. What can we say we just LOVE them all. It was incredibly hard to narrow down a few of our favorites to share with you so you will have to hop over and check out all the goodies for yourself! Some of our top favorites are:


This awesome guitar bag! I mean how cool is this I love it for myself but I am betting all the tweens and teens out there would love this as well, it's just cool!

If rock and roll isn't your thing she has you covered with this sweet as can be kimono baby set
Are you dying over this super cute photo? So adorable right? Well how about the darling top? I LOVE the button detail, and of course the cute skirt as well (sorry the cute girl doesn't come with it :)
Ok and one last thing since you know I am a bit of a sucker for boy things since there seems to be a shortage out there. I am just loving the cowboy bib. It's country but has a modern flair and the same time and I would just love any little guy sporting this, I kind of want to convince my 4 year old to wear a bib...

Ok so you are in love too right? Amazing I know. Well one lucky reader will win a $20 gift certificate to her shop. 
To enter:
Mandatory:
Check out Terra's Treasures and comment with what you just have to have from her shop. 
Want an extra entry:
*"like" Terra's Treasures on facebook found HERE
*Blog, tweet, or facebook about the giveaway (one comment for each)
*Follow shwin&shwin 

That's up to 6 entries!

Giveaway ends on Thursday June 2nd at 11:59 P.M (MST)

Good luck!
*Giveaway is now closed*

Winner Winner! and a special offer

Hmmm so maybe you noticed the extra day added to the Lofty Lou giveaway. I was kind of out to lunch literally... It was my birthday so I scheduled out some posts and lost track of the days so lucky you guys with an extra day to enter :) Either way I am pleased to announce that we do have a winner!

 Random.org choose #30 as our winner which is... Gayle! She said:

So lucky Gayle I will be in touch!

If you are sad that you are not the winner... Don't be Lofty Lou is offering our readers a special offer! That's right you can still get 20% off your order! Sweet deal right? (we think so!) So spend til your hearts content just enter BE LOFTY at checkout and save!

Friday, May 27, 2011

Chevron, my chevron...


I love stripes and more I love chevron prints. So while I was deciding which pattern to re-mix for the remix series, I had also made this top. It is a remix of THIS top, with free downloadable pattern. I made a few changes to the pattern but most of it is the same. 

This version simply has cute little ties at the shoulders...
And of course a Chevron design across the top. 
So if you would like to make one too let's get started...


Start with the pattern found HERE When I cut it out I cut the top of the shoulder piece so it was a flat half oval shape instead of a "U" shape. Also I lined the circle up to the pattern and cut the bodice the same size width. I did this so the chevron pattern would not gather like the original. Also do not cut them on a fold but cut out 4 individual pieces. I hope you have followed that... It will make sense as things go along. Now to make the chevron design, I started by making my own bias tape... To do this fold your fabric at an angle and cut strips double the width you want your stripes to be. Then fold the sides in and iron them so you have a strip with two folded sides...
Now line up the two front pieces of the bodice. Then take two strips and make them angle to create a triangle of sorts. Make sure they meet at the same place in the middle and they both end at the same place in the corner. Pin them in place.
Next decide your spacing. Since the strips I used were 1 inch thick I spaced them by 1 inch as well to keep things even. So pin the next strip in place one inch away from the first.
Continue until all the strips are placed. Everything should line up nicely if it doesn't fix it since it will be uneven when you sew if it is uneven now.
To match up the sides I lined up one of the front pieces to the back and made sure all the stripes matched up. Then if you lay out the whole top seam to seam everything should match up.
Now you want to sew the strips down sew as close to the edge as you can. Then sew the two front pieces and the two back pieces together. For the back if you want a button opening (which is optional) Then stop a few inches from the top of the center seam.
You should have two pieces that look like this when they are done.
Next for the impossibly hard to see white on white pictures... oh my it's bad and the few that followed were so bad you couldn't tell at all what was going on so I hope you stay with me here... Take the front yoke piece (which could be the same in the back if you skip the buttons) There should be two pieces. sandwich between them the ribbon for the ties with the ends sticking out the top. Then sew along the top edge. Turn it right side out and you will have a top yoke with two ties at the top. For the back you will either have two whole pieces like the front or 4 half pieces You will do the same thing but sew the flat side and top edge so you have two finished edges when done. Ok you still following that... 
Next take the yoke pieces and pin them in place to the curve of the bodice pieces. I added some piping in between the layers, but it's up to you. Sew in place. It will be the same for the front, you just will sew on either side of the slit in the back if you are using two pieces.
So then you will have the curved yoke all sewn in place.

Next I added some piping around the arm opening. Sew to the right side first with the flap along the raw edge. Tuck under the top of the piping so it is a finished edge showing at the top. Then turn it to the inside and topstitch in place.
Add some buttons to the back if you did two panels, which after I did it I decided it was not necessary since the top ties it can just slip on and off over the head, but it added a little something to the back anyway so I am ok with it.  Hem the bottom to your liking and you are done..

The perfect little summer tunic with cute little ties...
A fabulous chevron design...
And some buttons down the back...

Thursday, May 26, 2011

Blackheads, blimishes and zits oh my

After receiving a lot of great questions about skin breakouts and imperfections next week I'll be doing a post dedicated to answering those and dealing with skin imperfections. So if you have any questions of your own make sure to message me before Thursday June 2.

Thanks and make sure to check back next week!

Wednesday, May 25, 2011

Garden Party Frock

This is a (re-post) of the dress I shared on Celebrate the Madness
To play along with the "dress a day" fun I made the Garden Party Frock. It is inspired by the drape and flow you would find on a greek goddess but tailored for the butterfly chasing little girl attending her very own garden party. 

We got hit with some constant rain storms so we moved our garden party indoors and had some fun catching pretend butterflies and dancing in falling confetti instead.
Do you want to make your own garden party frock?
Great let's get started.

I used a tank that fits my little one to create the bodice pattern I made two front pieces.

Then I cut one shoulder off the two front pieces.

Then I cut one back piece. (see how the front pieces over lap)

Now for the crinckle crepe fabric that I used as my overlay I wanted it gathered so I lined up one side and cut it out tracing the under-arm. 

Then I moved the piece down on the fabric and cut out the rest.
This makes it much wider than the base.

Start by gathering the overlay to fit the base.
I used a basting stitch then pulled to gather. (this is the back) then sew the overlay to the base at the neckline and underarm.

Same basic idea with the front pieces only you will be doing it to both pieces.

Then turn the pieces right side out and you should have nice finished edges along the neckline and underarm

next gather the bottom of the the overlay so that it matches the base as well.
Just pin it in place for now.

Now we will sew the front and back bodice pieces together. With right sides together sew the shoulders and side seams.

Next make a front and back skirt piece. It should match the whole bodice piece so there will be two front pieces sewn to either side of the back piece. I made mine a bubble skirt to do this I cut the skirt half the length I wanted then I cut one out of the overlay fabric that was twice as wide and tall as the base. 

Then Gather the top and bottom of the overlay skirt piece. Sew the gathered piece right sides together to the skirt base then when you flip the seam to the inside and match the top of the overlay with the top of the base you have a nice bubble hem. Then pin the skirt to the bodice. Sew together.

Now you have a wrap dress last thing to do is attach a snap on both sides to secure the wrap in place. (one for the inside of the wrap and one for the outer layer) I used sew on snaps for this so nothing would be visible on the outside. Lastly I added a ribbon tie to the outside closure to fancy it up a bit.
Then you have a feminine puffy bubble wrap dress perfect for a garden party

Or at least the chance to dance in some confetti while you wait for the rain to pass...

Black Bird...(tunic)


 Jessica from Me Sew Crazy has put together a great series on her blog called Pattern Re-mix. Packed full of some amazing guests and fantastic pattern re-mixes! We were pretty honored when she asked us to join in the fun. Jessica is so sweet and kind, and she has some of the most creative ideas and designs over on her blog, we just love being a part of the fun event. After a lot of thought and a lot of re-mixes I decided to remix one of the first tutorials I ever shared the circle top. It has been one of my favorite designs for some time and I thought it could use a little re-working. As a bonus, I created a free PDF pattern for you all! (can I get a whoop whoop?) Sorry that was lame but the top is not. It should not come as too much of a surprise but I am a pretty big Beatles fan. My kids are named after a song and an album, and well I love all of their music. This tunic was inspired by the song Black Bird...
 Black Bird singing in the dead of night
Take these broken wings and learn to fly
All your life
You were always waiting for this moment to arise...

 It always makes me think of kids when they reach that point in their life where they learn independence (right around 2 for this little girl) They sprout their little wings and try to fly on their own. It's usual a period of a power struggle between me not wanting to let go, and my baby telling me she wants to do things by herself...
So this summer, I will let her have her independence, I will let her poke a stick in a bucket of sand, and gather up her treasures and store them in her pocket, and I will let her do it with style that won't hold her back. So here is the perfect little tunic for the little birdie in your life...

So good news first. I made a pattern for this one free for you to download if you like. Bad news? I only made it in the size I used so if you are needing roughly a 2T then you can download the pattern

 If 2T is not your size, no problem, making the pattern in any size you need is pretty easy to do. Start by taking a shirt that fits well and lay it out flat. Trace the neckline and shoulders of the top. Then measure the shoulder line, and take that meausrement and make marks from the neckline out. Then connect the marks together and you should have a nice little curve. (something that looks like the middle picture above) Then trace cut out the piece and then trace the piece again, then line the first piece up to the shoulder of the piece and trace a few inches. This will be the overlap for the button closure. 

 Next make a bodice to do this fold the first neckline piece in half then move it in a few inches from the edge of the paper. Then trace the curve and continue it to the edge of the paper. add an arm curve. (you can use the shirt as your guide to see how low the curve needs to be) Then Make it as long and wide as you would like, I made mine a simple A-line. You will cut out two front neck pieces and two back neck pieces, then 2 bodice pieces both on a fold. 

 Then next thing I did before I started sewing I made my own piping, which is easy to make but you can use store bought stuff if you want. To make piping, there are a lot of tutorials out there for it, but the simple version is cutting strips of fabric on the diagonal or bias. then fold the strips in half around small rope, or twine, or in this case I used what I think was an old shoe lace... Then sew very close to the rope in a straight line.
 Then you have your own design or pattern for piping. 
 Now for the sewing start by sewing both the outer and the lining pieces. You will sew the front and back necklines together at the one side shoulder. Not the shoulder with the overlap piece.

 Then you will line up the outer and lining pieces so the right sides are together. This is when you would sandwich the piping in between the two layers. I had the piping go around the outside of the circle but not the inside, you can do whatever. Just line up the raw edge of the piping with the raw edge of the neckline pieces. Then when  you sew sew as close to the rope of the piping as possible.
 Then you sew all along the edges leaving a small opening so you can turn the piece right side out. Then be sure to clip the curves so it will lay nice and smooth.
Turn it right side out and sew the opening closed, but don't top stitch the whole thing you will do that later.

 Next the pocket, the pattern includes a pocket piece but if you are making your own pattern just cut out a square. Then fold under all the edges and press them flat. Then top stitch the top edge. 
 Before you attach the pocket you will want to sew the front and back bodice piece together at the sides. do this with right sides together. Then place your pocket where you wold like it, I placed mine centered on the side seam. Pin in place them sew around the sides and bottom.
 Next I took some piping again and sewed it to the right side of the arm curve. Then turned it around to the back and I had a nicely finished edge with piping at the top. 
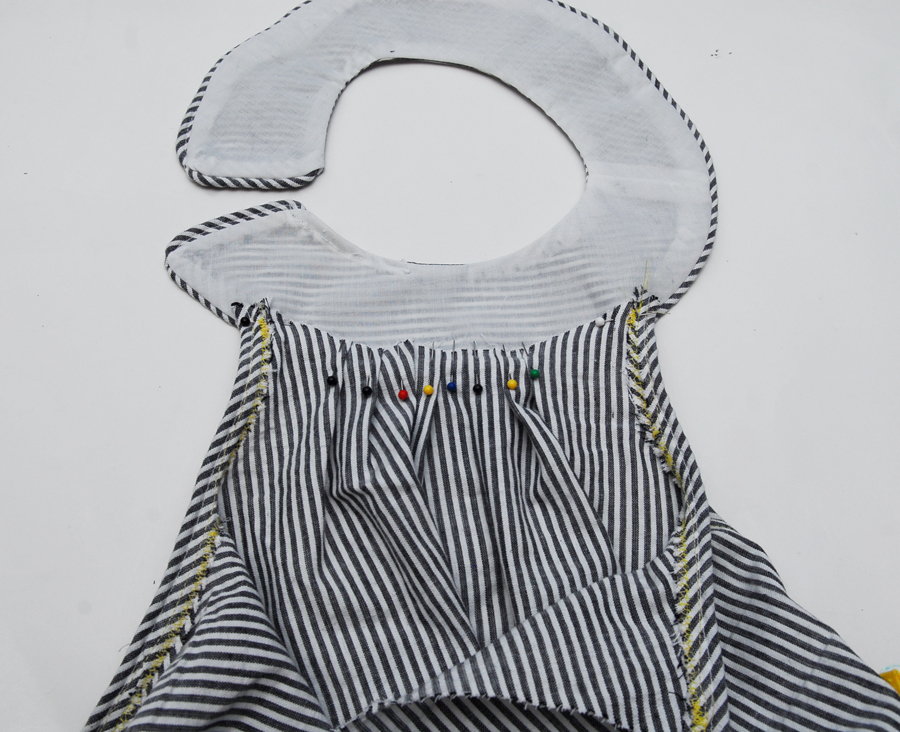
 Next line the edges of the bodice with the place on the neckline. They should be down a little bit from the shoulder line. Then pleat or gather, I like the look of pleats so I did pleats, but you want the bodice to fit the curve of the neck. Don't pin the pleats to the neckline, just secure them in place. Once it fits do the same with the back piece.
 Then you want to sew the pleats in place to secure them. Then I also serged the top edge to finish the fabric.
 Next pin the bodice in place again to the neckline piece and this time you will sew it in place. I used a double needle to give it the added detail of a double stitch so I had to sew on top, but with a single stitch you could sew on either side. This is the point where you would top stitch all the way around the neckline, and as you topstitch you will secure the pieces together.
 There you have a nice and pretty neckline.

 Next the flap on the one side that overlaps. I met up with my life long nemesis and decided a button hole was the only proper thing to do. (except maybe a snap) I hope it's not just me but button holes and I do not mix! Oh man they get the best of me each time, I did 4 practice holes and each one had issues, then I decided it was now or never and bit the bullet. It actually turned out pretty well. My machine does all the work and I still mess them up... go figure. Anyway the button hole and big button made the top, so I glad I overcame the fear...
Hem the bottom and there you have it a new and simple but possibly favorite tunic for summer.
 I love the curve of the neck with, and the big chunky button
 And the pocket of course for all of the summer treasures like fresh lilacs...