Monday, May 2, 2011

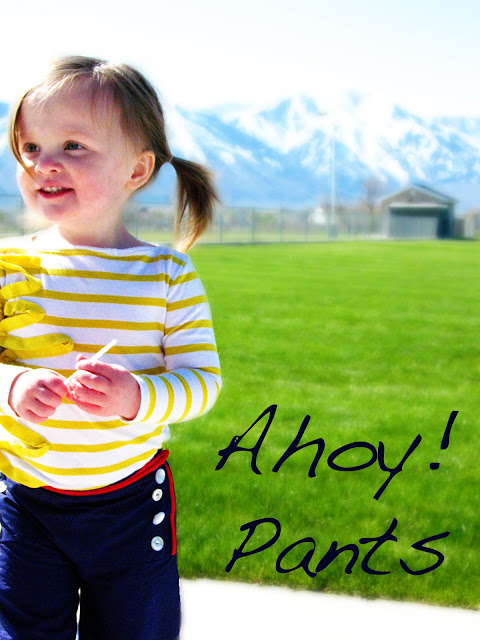
Ahoy! Pants

Mother Nature lost her marbles and provided us with a complete white out snow storm, we got several inches on Friday and then she changed her mind come Saturday the sun came back out and melted it away. Today we went to the park and enjoyed the sunshine. What better way to enjoy the beautiful weather than with a new pair of summer pants? Inspired by all things nautical for summer I bring you the Ahoy! Pants.  

There are a million patterns or tutorials out there for "sailor" pants, or bib front pants, but like most things I just stumbled my way through until I found a way that works for me, so if you are afraid of them don't be, I even made these with a Faux front flap so you don't have to mess around with button holes. Easy peasy. Want to try some out for yourself?


Start by grabbing a pair of pants that fit. Then you will trace the front and back. You trace them as you would when you are making any pair of pants, only I made these wide legged  so I drew the legs quite a bit wider than the pants. Also add length up at the top for the waist band to fold over. 

Then do the same for the front piece only angle the front top so that the top measures across the width of half the front of the person. This sounds confusing... so here is an example, My daughters waist is 19 inches. So her front measurement would be 9.5 and half of that (since there will be two front pieces) is 4.75 add for seam allowance and you have the measurement for across the top. Since I wanted the front to lay flat I measured across the top marked it and then angled that into the leg width. Make sense?
Ok then trace your front piece starting just above the crotch. This is to make the front flap.  
See front flap. You will want to trim it up a little so that it doesn't overlap the front piece (that will make more sense later) 

Then cut away the extra space of the front piece pattern. 

Now then first I cut out the pants, 2 front pieces, 2 back  pieces and one front flap (cut on a fold along the flat side) Then I cut out two pocket shapes and using some bias tape I sewed to strips across the pockets.

Then iron the sides in.

Next take your two back pieces and with right sides together sew from the top down to the crotch.

Then Press the back flat. Then fold the top down so you know where the waist band will be. Then you can place the pockets on the pants and sew them down along the sides and bottom. 

Next sew the front pieces right sides together from the top to the crotch.

Press it open and serge or zig-zag stitch the inside.

Next take the flap. You can hold it up to the pants and make sure it covers the "U" shape but doesn't overlap the sides of the pants. Then I took some piping and sewed it along the front flap. To sew on piping sew it so the flap is lined up with the outer edge of the right side of the fabric, the piping on the inside. Then sew as close as you can to the cord in the piping. Then when you turn the flap around to the back side your front flap will be nicely trimmed with piping.

Then sew the front flap to the front of the pants. 

Then flip it up and pin in place. Then sew it in place along the edges.

Then take your front and back pieces and sew along the sides and the inside of the legs. Then hem the bottom of the pants.

Next fold the top down in the back and front so it matches up with the front flap. Then put elastic in and sew it in place.

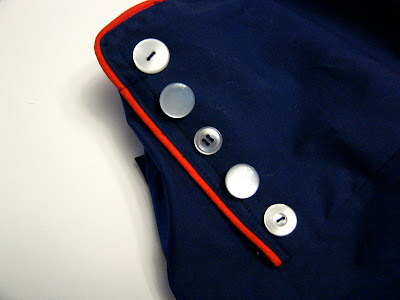
Then for the final touch I added the buttons along the front you know the ones that make sailor pants... Only for a little something different I raided my button stash for the same color (pearly white in this case) and grabbed a few that I had only two of. Then I sewed them down in place. I like that they are the same on both sides of the pants but each button is a little different. 

That's all there is to it for some fun new summer worthy pants.

The wide leg makes them even more comfortable for lots of summer bubble blowing fun, and the bright colors are just fun!

No comments:

Post a Comment