 |
| To kick off our sewing for the KCWC we thought we would start with revisiting our pleated mary jane baby shoe. We are so humbled and amazed at the response we had over this pattern. After posting it back in November we have had over 4,000 downloads and nearly 100 sent out via email! It was more than what our little blog could have ever thought possible, and we still get about 1,000 hits a day just to that page. As you can imagine, we have had a fair share of questions concerning the pattern and construction, and so we have thought for some time that we would "re-do" the tutorial of sorts making it a little more clear and answering some of the questions we have received. Start by downloading the pattern (all in one download now)Pleated Mary Jane PDF |
 |
| When cutting out the pattern you can follow the cutting instructions on the pattern, cutting two of each piece (four of the sole but 2 lining and two outer) You want them to mirror each other so you have one for each foot. To do this fold your fabric so the right sides are together and cut two out at once this will give you one for each foot. I am using a faux leather for the outer and a fleece for the lining. Neither fabric is very thick so I cut the pattern to fit, however if you are using a heavy or thick fabric you will want to add a slightly larger seam allowance so the shoe doesn't shrink on you as you sew it up. *Also the pattern was created with my kids feet in mind so it is slightly narrower than most baby shoe patterns. If you would like a wider shoes add a little width to the sole and a little length to the long part of the upper.* |
 |
| To start sewing them take one outer layer and one lining piece and place them right sides together. Then I start by lining up the long edge to match and pin it in place. |
 |
| Next you will add pleats. |
 |
| To do this you create a fold in the fabric and then pin to secure. |
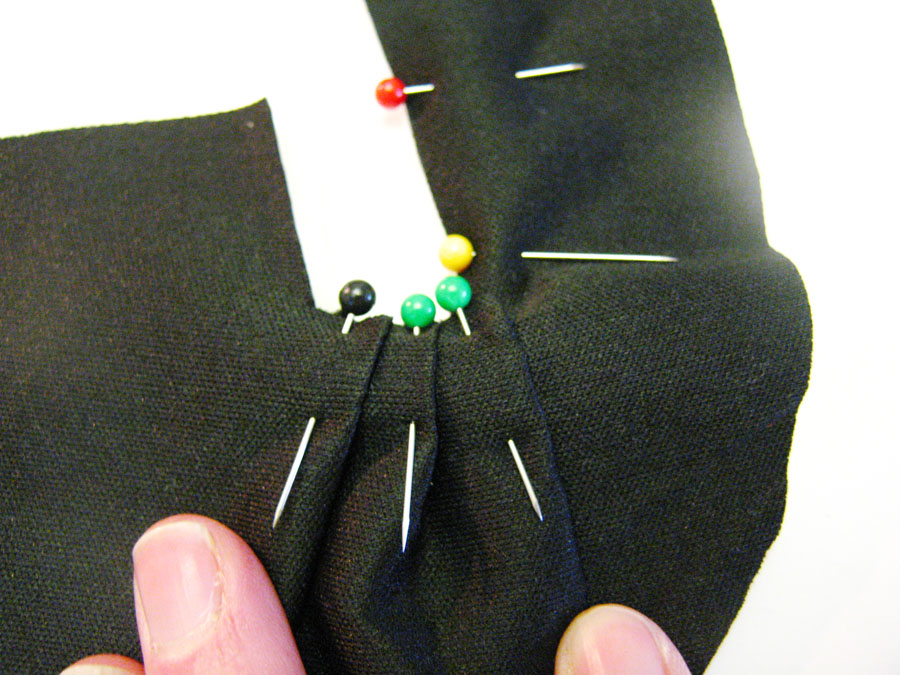 |
| I tend to fit three across, however yours may vary depending on the size of your pleats. You add pleats until the outer piece is the same size of your lining. |
 |
| One last thing I do is pin the bottom of the pleats in place it helps to keep everything in place as you sew. |
 |
| Then sew just in side the "J" shape and then you can turn the pieces so the right side is out. Then I top stitch along that same line. (which is just sewing along the side) Leave about 1/4 an inch from either edge so you can sew the side seam. I also tend to sew the bottom of the pleats so they stay in place later. |
 |
| Next we will sew the side seam. Line up the top of the "J" with the end of the "J" the lining should line up the the lining and the outer piece should line up with the outer piece. (right sides together) |
 |
| Then when you fold the lining in you should have the top of your shoe done. If you didn't already sew the bottom of your pleats in place now is the time to do so. |
 |
| Now is also the easiest time to add an embellishment. Here is my advice when adding an embellishment to a young child's shoe, especially a baby: Use embroidery floss and use all 5 strands. That means 5 strands have to break before anything comes loose. Create a knot after each addition to secure them tightly down (no wiggle room) We good? Add some glue if you are nervous about the sewing not holding up. |
 |
| Next pin the sole on. Take both sole pieces the outer and the lining and with the shoe inside out pin the lining so the outer piece goes first (this means the right sides will be together) Also check that the square of the toe is on center, if it is off it will be off when you sew it. |
 |
| Pin all the way around the sole. |
 |
| Now for the sewing, I take as little seam allowance as I can. The larger the seam the more fabric is left bunched up inside the shoe. (no good) So the pattern has a very small seam allowance built it. I start at the toe to be sure it stays on center. |
 |
| Then when you get to the heel (another tricky spot) you need to make sure what you are sewing is laying flat and smooth. You can bunch the fabric up elsewhere just be sure the part you are sewing is smooth. |
 |
| Next clip the curve of the heel and toe so the shoe will lay nice and smooth. |
 |
| Then you are done with a shoe! |
 |
| Do it all again and you have two! |
 |
| Next add straps, I choose elastic in this case, and just secured it on either side of the shoe. However the pattern does include a strap the length is up to you and what is best for the little foot that will be wearing it I tend to start long and make the strap shorter as needed. For more options check out the First Shoe Post. So not too bad right? I would say they are not the easiest project for the beginner sewer but definitely doable, it just takes a little patience. Did you make a pair already? Upload them to our flickr group we would love to have a little shoe parade! Also if you are loving this pair they could be yours! They are my donation to the prize package over at a Jennuine Life Check it out for details! |
No comments:
Post a Comment