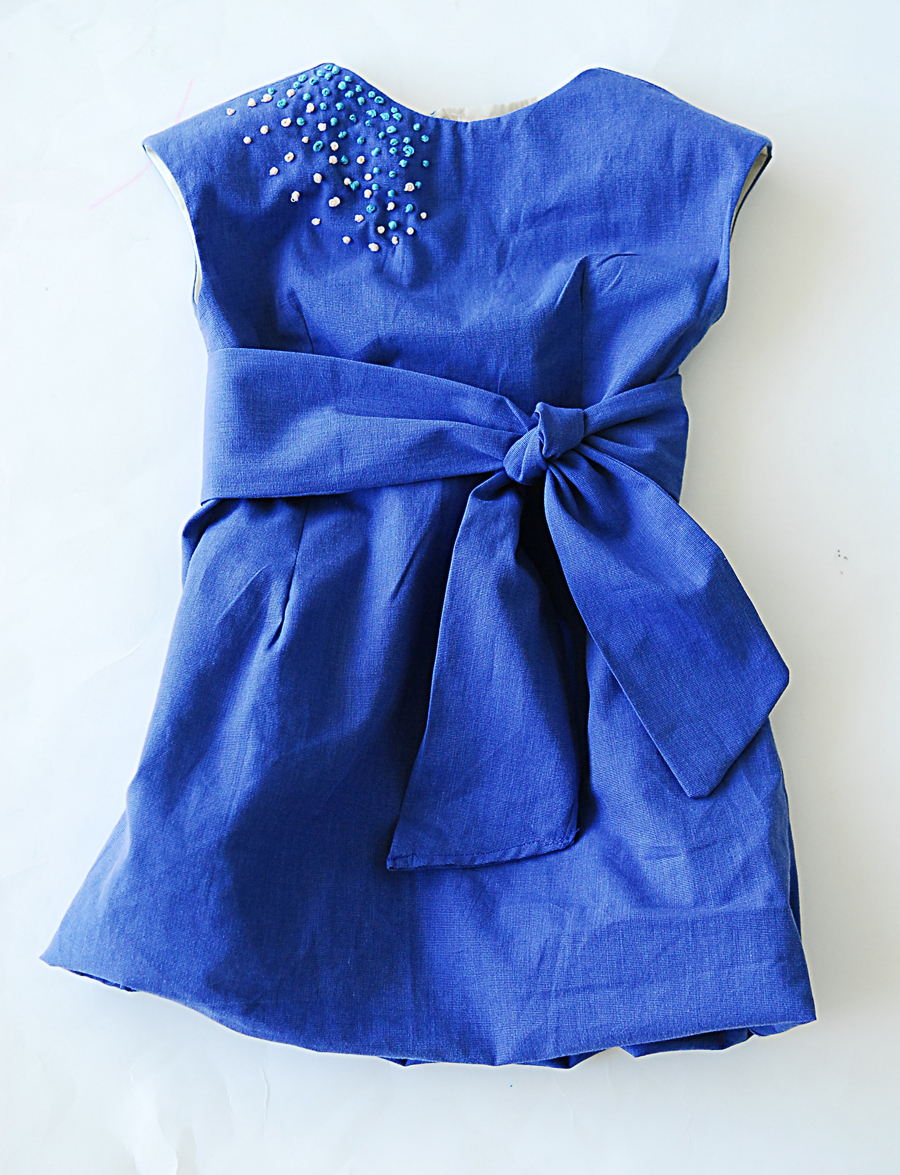
Ready for the first Garment Friday? Oh it's not Friday? Yeah that day seemed to come and go things have been crazy with school starting (tomorrow is the little dude's first day) Also my parents came into town for a 3 week visit. So time is flying by. However I wanted to share the dress I made using one of the lessons taught last week. Darts. I love darts. THey give such a feminine shape to any garment. This is true even for little ones. This dress today however could be made following the same steps in any size even for an adult and the shaping would be very flattering.


It is actually a knock off. I don't typically do straight knock off's but occasionally I will see something that I love so much and refuse to pay for when I could make it myself. This dress from crew cuts was just that. I loved the simple lines the hint of structure and the big bow. The original does have a zipper on the back, and while I love it I decided to use the buttons from the men's dress shirt that I used to construct the dress. You could do a zipper. So would you like to make one for yourself?
Great let's get started.
You will want to make a bodice piece pattern. Do this by tracing the bodice of any top that fits nicely. Trace the shoulder and arm opening. I traced mine on a fold since I like my pattern to be cut on a fold. Then you should have a pattern piece that looks a bit like the one above. You will need to make a few alterations so it works for this dress. First you will add width in the shoulder as to add a bit of a cap sleeve. (shown in the white line) Then for the back bodice piece you will extend the side. For this I cut the bodice piece (2 pieces for the back not on a fold) I lined up the edge with the button flaps of the shirt. That way the button flaps were the extended edge and they would overlap to fit to size.
You will also want to add a dart at this point. You can see how you would do that in this post on
darts.
Once you have a bodice piece with a dart drawn in making the skirt with a dart is easy. Simply place your bodice piece face down upside down and trace the top line. This way your skirt piece will be the same width and have the dart in the same place as the bodice piece. Mark the darts in the same place as the bodice.
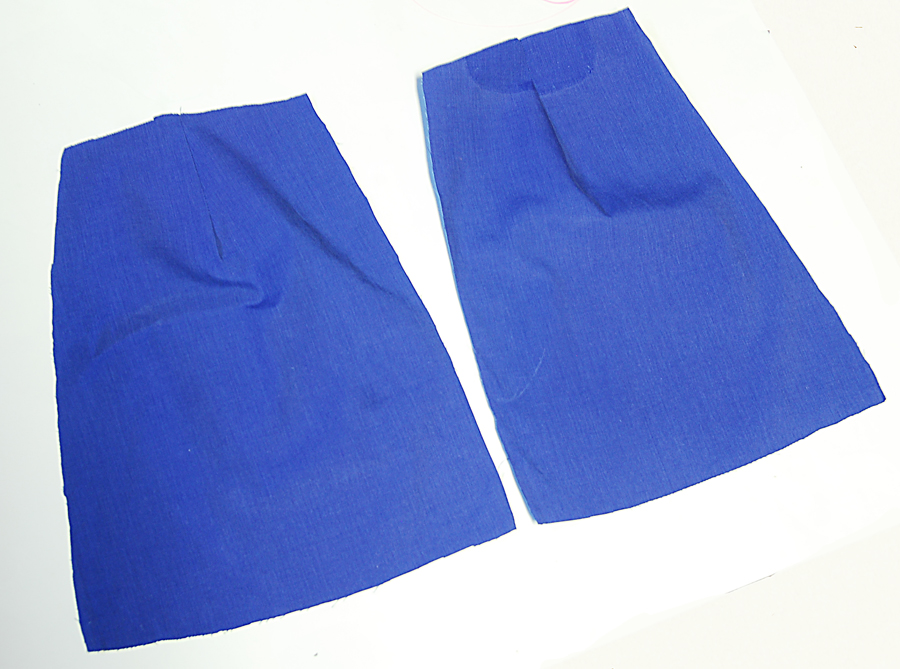
I made my skirt piece a slight A-line. That means the edge not cut on the fold has a slight angle outward. It will have a bubble hem so you don't want to flare it out too wide. Then you will cut one on the fold and two not on the the fold.
I used this man's dress shirt to cut out all my pieces except the bodice facing and the skirt lining. For the skirt lining simply choose a fabric and cut the same 1 on the fold and two off the fold skirt pieces only you will make them 3-4 inches shorter than the outer skirt pieces.
Then out of the same light weight fabric as the skirt lining I cut out my facing pieces. To make the facing pattern simply cut it away from the bodice pattern. Cut one on the fold and two not on the fold.
Next for the sewing. You will start by sewing the darts. You can sew all the darts at the same time. If you need help sewing darts you can check this post out
here. Sew them on the bodice front (as shown) two back pieces and the skirt pieces, front and back pieces and the lining pieces as well.
Then you will sew the front and back bodice pieces together at the shoulder seams. (
need help with seams?)
Then do the same with the facing pieces.
Next with the right sides together sew the facing to the bodice. Sew the inside of the arm opening and the neckline. To help with the curves and save time off notching use pinking shears to trim the seams.
Then turn the facing to the back and the top right side out.
Next match up the side seams and sew them together facing and bodice.
Moving on the skirt. You will be sewing the lining to the skirt right sides together along the bottom hem.
Do the same with the two back pieces.
Then with right sides together line up the front and back skirt pieces and sew down the two sides.
Then turn the skirt so the lining is on the inside and the lining and skirt pieces meet at the top. This should create a nice bubble hem.
Next Sew the bodice to the skirt piece. Line up side seams, darts and have the back pieces overlap, so the buttons line up with the button holes.
Now you have a very basic dress with darts all matched up and pretty.
Next I added extra buttons and button holes to the back of the dress to fill in some of the gaps.
I added a small cluster of french knots up at the shoulder for a little interest. (
need help with french knots?)
Lastly I made a belt. To do this I cut long and wide strips from the sleeves of the shirt sewed the two strips together and then folded them and sewed the edge to create a long tube. I turned it right side out and there I had a belt. Tie it in a knot and it is ready for wear.
It looks cute as can be on a studious little girl. (she is in love with these fake glasses lately. I laugh because they are Shwin's they have gotten tossed around in several different boxes from several different moves. Somehow while we were splitting belongings after we were no longer roommates I ended up with the ugly fake glasses... which Abbey loves. go figure)
I just love the wide belt, bubble hem and buttons down the back. In the fall this will be great layered with some leggings, boots and a cardigan, but for now we are loving the last bit of summer.


No comments:
Post a Comment