This pregnancy is a doosey I tell ya. If it's not one thing it's another. I am getting over my second stomach bug. Life seems to go that way sometimes. So lets check out a past guest post today and hopefully I can get myself together enough to meet you back here tomorrow for the link party!
Hello Family ever after readers! My name is Shauna and I blog with my sister over at Shwin&Shwin. (yep
we are both shwins it's a family nickname) I sew obsessively, and recently started a
pattern line as well as
sharing many free patterns. My sister shares
skin and beauty tips, together we just have a lot of fun! :) I was thrilled when Rach invited me to be a part of this fun series! I think we all have blog crushes out there, I know I have tons! I thought it would be fun to make a project that included one of the projects from one of my favorite blogs.
When
Jess from CINO shared this dress I was instantly in LOVE! I love big bows and I knew I had to make that! I decided to put it on tee, the great summer essential. Only naturally we will make our own tee :)
Because making your own means adding little details to it that you can't find at the store, and making it fit the way you want. Honestly I rarely make a tee shirt because you can usually buy one pretty cheap, but making them is so easy and sometimes I just can't find the perfect tee and so knowing how to make one is great to know
Let's get started. Grab a tee that fits pretty well, we will use that as the "base" for the pattern. If you are new to using knits, or if you are afraid of them... 1. don't be, knits are great, and super forgiving 2. Start with interlock jersey knit. It only stretches one direction (which for a tee shirt should be side to side) and so it sews like a dream and not a stretchy mess. Then you will trace around the shirt, and as you go add in your seam allowance. If you need more help with how you use a tee for the pattern you can
check out this post As you can see here the tee was too short for my liking so I added several inches.
We are going to add a neck ribbing to the neckline. Confused about neck ribbing? It's really easy, cut out a strip that will be folded in half length wise so make it twice as thick as you want, I made mine oh, about an inch and half ish... then wrap it around the head on the child that will wear the tee. If you have big headed kids like mine (thankfully they don't start out that way :) Make sure to wrap it around the biggest part of the head, stretch it so it is tight, but so that is can easily slip over the head since that will be how the tee gets on and off. Also notice that I pinched my seam allowance with my fingers so it's not included in the stretch.
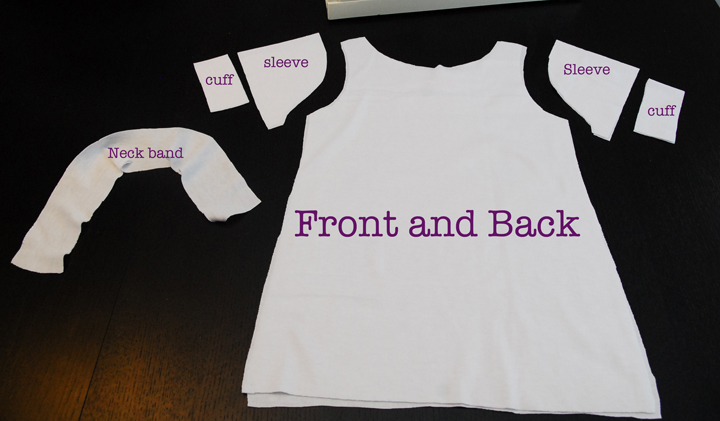
So let's check out the pieces we have, front and back of tee? Check!
Sleeves? Check!
Neckband ribbing? Check
Sleeve ribbing? check? Ok let me explain, I like to finish sleeves with ribbing sometimes, simply wrap a piece around the arm the same way you did for the head, only I make it a little looser, cut two
so sleeve ribbing? Check!
Cool let's get started...
Sew the front and back right sides together at the shoulder, then lay it flat and add the sleeves. I added some little pleats at the shoulder of the sleeve which is a nice girly element. Now when sewing with knits, and sewing a seam that should stretch, like the sleeve, you don't need a fancy machine but most machines have a "stretch stitch" it looks kind of like a lightening bolt, (check your manual) Using that fun stretch stitch sew away and the seam will stretch instead of busting a seam.
Then both sleeves should be set in place.
Lets sew those cuffs. Its a great way to fish the edge, but you could just hem them and skip the cuffs. For the cuffs (or ribbing if you will) fold the cuff length wise and then find the middle point. Pin the middle of the cuff to the middle of the sleeve so all the raw edges are together. Then pin the sides to the sides of the sleeve. You will see the cuff is smaller than the sleeve edge.
As you sew the cuff to the sleeve stretch the cuff to fit the length of the sleeve. You can use a regular straight stitch or the stretch stitch for this, either way it will stretch since you are stretching as you sew.
Then you will notice a nice little cuff with a pretty puckered edge. Perfect.
Now lay the top inside out so the front and back are all aligned and sew the side seam and sleeves. (follow the black dotted line)
At this point I went ahead and added the bow to the front, which likely would have been easier before the last step, but it was fine... How do you do the bow?
Follow Jess's amazing tutorial!Now let's move on to the neck ribbing. Sew the ends of the band together to create a loop. Then fold the loop in half so that seam is on the inside. Mark the middle and sides of the band. (the back middle should be the seam)
Pin the neck ribbing to the middle front and back and the side shoulder seams. Then stretch to fit as you sew just like you did for the cuffs.
Then you can topstitch (again as you stretch) so that the ribbing seam stays put on the inside just stitch right along the seam towards the inside. Stitching as you stretch still ensures that it will stretch over the head without busting the seam.
I skipped the top stitch on the sleeve which also would hold that seam in place so the ribbing doesn't flip inside out, but instead I wanted to add some buttons, because I LOVE buttons and they are cute. So I stitched a little button at the sleeve that will hold the seam in place. Then hem the bottom edge of the shirt. A straight stitch is fine just stretch the shirt slightly as you sew and you are good to go.
Then you top is done, and cute as ever. Making a tee and working with knits is a lot of fun!
Abbey was naturally a big fan since purple is her favorite color.
A button and bow... what's not to love? Of course there is always the "being proud of the tee you made"
Thanks so much for having me Rach! What a fun series! I can't wait to see more!


No comments:
Post a Comment