I had this project. I started it awhile back and then I got half way through and decided it was a total craft fail and stashed it away. Then one night as I was laying in bed thinking through sewing projects (you all do that right?) Then it came to me. I knew how to fix the shirt, or well complete it in a way that it wasn't a craft fail. Now? I LOVE it and I am so glad I finished it. It is the perfect summer top and so easy to make in any size you need.
I love the cute bubble effect and since I love all things nautical for summer I love the anchor on the front. The top pairs really well with the
Sail Away Pants So shall we get started?
For the bodice measure the widest part of the chest. Divide that in half, and add 1 inch. (seam allowance and wiggle room assuming a 3/8 inch seam allowance) If you want a looser fit add 2 inches. That will be the width of the bodice piece for the front and back. The height of the pieces is up to you and how wide you want that piece to be. I also cut mine out with a bit of a sweetheart neck you can cut it however you wish. Cut two for the front and two for the back.
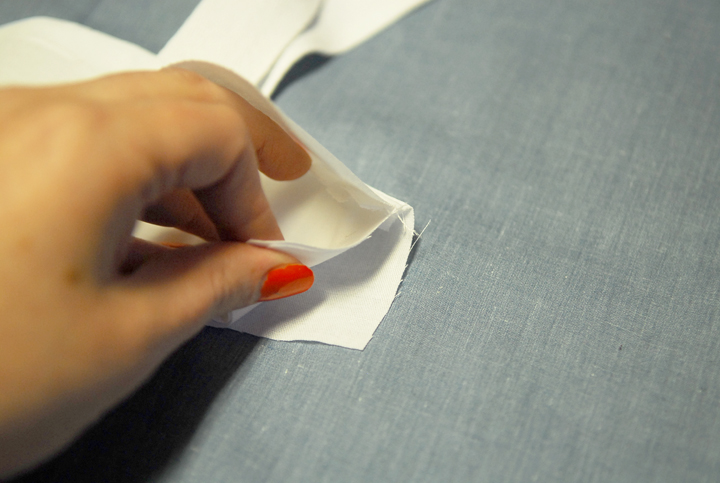
Then lay some ribbon, or twill tape, so that it hangs over the top of the bodice. (these will be the shoulder ties)
Then place the second front bodice piece on top so the ribbon is sandwiched between the two layers. Sew along the top. (follow the dotted line)
Then clip the curve where you need.
And you have a nice finished edge with ties.
Do the same with the back pieces and you will have a front and back with ties.
Now match up the side seams.
Line up the sides so the seams match up and then sew the sides together.
Now the top bodice is done.
for the skirt portion cut the top to follow the line of the bodice. Then I cut it at a slight A-Line. Cut a front and back.
Then sew the front and back together along the sides.
Then sew the bodice to the skirt with right sides together.
Top stitch along that seam.
Then hem the bottom, but leave a small opening in the seam so you can slip elastic into the casing and gather the bottom of the shirt.
Then I added a little Anchor using some flocked vinyl.
More on how to do that here. So that's all there is to it. Super easy right? And cute so summer fun is ready to be enjoyed!
Nothing better than a bubble top.
And a love the simplicity of the ties at the shoulder. Cute little nautical fun.


No comments:
Post a Comment