Wednesday, July 13, 2011

The "Babbey" Tunic

 Yesterday we made some leggings. (the white ones in the picture) So now I have 3 different tops made to go with the leggings to give you three totally different looks. Today's is a nice and long tunic. Appropriatly named "babbey" which is what my daughter calls herself. 
 A lot like the circle top, or the dreaming of sunshine top. This top is a twist on my favorite looks and offers a V neck for the front and back with a button overlap in the front (or back if that's how you want to wear it) 
So let's get started shall we?


 Start by grabbing that go to pattern making shirt. (you know the one that fits perfectly) Turn it inside out and fold it in half. Trace the shoulder mark and then make a mark where you would like your V neck to come down to. (you can see my little mark there) Then mark the neckline. Then take your ruler or straight edge and connect the dots. Draw a straight line from the shoulder mark to the neckline mark and then from the other side of the shoulder to the bottom mark. 
 Now cut out your neckline piece and use it as your guide for the bodice piece. Trace the neckline piece and then on the add a curve for the arm and add as much length as you desire. (easy right? I love two piece patterns)
 So when you cut them out cut two neckpieces on the fold and then 4 not on the fold. For the ones not on the fold add an extra inch of  allowance for the button overlap.
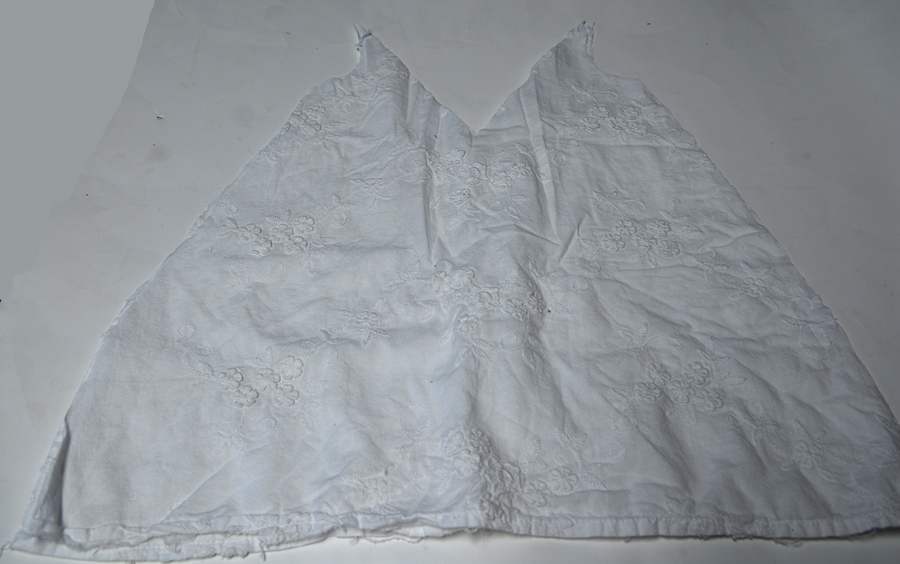
 Then for the bodice cut two out on the fold. 
 Start by sewing the neckline pieces together. Sew them at the shoulder seams. You will make two of them. 
 Next with right sides together sew one of the bodice pieces to the back V. 
 Next (and it is a little hard to tell that it was done but it was) Sew the other neckline piece to the neckline. Right sides together sew only along the inside of the neckline. Then turn it around to the back side. 
 Now hopefully this next part will make sense it was tricky to take a picture showing you exactly what to do. Sew the other bodice piece to the front V pieces. To do this first you have to line up the overlap pieces. Pin them to secure. This should create a V for the front and then you want to sew the bodice piece just as you did for the back. Only sew it to the front neckline piece. (since there are two layers make sure you only sew it to one layer make sense?) Then you should have a nice little over lap.
 Then with right sides together sew down the side seams of the bodice. Next for the arm openings, sew some bias tape to the right side and then turn it around to the back and stitch in place. 
 Now for the inside layer. fold under the edge around the front and back and sew in place. 
 Lastly hem the bottom add buttons and button holes to the overlapping flap (optional of course) Then you are done! Pretty easy right?
Now you have a fun little tunic perfect for summer since there is still plenty left, but you can easily add a cardigan for a great fall transition.
 I love the V in the back.
And the overlapping V in the front with the button closure. 

Enjoy!

Tuesday, July 12, 2011

Let's talk leggings!

Leggings are a staple in a young girls wardrobe. They often complete an outfit, they are comfy for little ones and simple. 
Back in October of last year I did a week of leggings. 
You can check those posts out 
(and one more legging HERE)

I made a new pair that I am loving! They are a lot like a cropped pair of tights. 
They go perfectly with the two new tops I made her.
A long tunic...

 And a shorter bubble top. 

Making a pair for yourself couldn't be easier, a few scraps and about 5 min and you can have a pair of your very own. 

First things first. Find a basic legging tutorial that you like, any of the ones above, or any other tutorial. All you need to do is trace a pair or leggings. 

Now for the "tights-like" legging you have to choose your fabric carefully. The fabric MUST have 2 way stretch. This means that you can stretch the fabric in every direction. Think rayon, spandex blends. There are thinner fabrics and heavier fabrics to choose from. For white I went with a heavier fabric so it is less see through and revealing. 

 When you are cutting out your pattern make the legs about 1/2 inch narrower than a regular pair of leggings this will make them nice and snug but a fabric with lots of stretch will still be comfortable. Also no need to stretch out the waistband since we will be skipping elastic in these just make sure the top is a little narrower than the leggings you are tracing. 
Lastly let's talk about sewing. You will need to use a stitch that allows for stretch. For my machine it is called the stretch stitch and although white on white is really hard to see it looks a bit like a lighting bolt zig zag. It holds the fabric and seams together well but allows the fabric to fully stretch. The reason this stitch is important is so that the waist and ankle openings stretch to fit and so the other seams don't break when she sits down. I simply fold under the leg cuffs and sew in place and then sew the waist band under and sew in place. Then sew up the legs and sew them together as normal. Before you know it you have a snug (but comfy) fitting pair of leggings. No elastic needed since they are snug enough to stay up alone. 

See you back here tomorrow with the tutorials for the new tops!

Friday, July 8, 2011

Spa treatments vs. home treatments

Skin feeling dull and congested? Have you been considering an exfoliation treatment? Took me longer than anticipated for this post but better late than never right?
Microdermabrasion

Microdermabrasion is a general term for the application of tiny rough grains to buff away the surface layer of skin. Many different products and treatments use this method, including medical procedures, salon treatments and creams and scrubs that you apply yourself at home. Its usually done to the face, chest, neck, arms or hands.
Whether done with a product at home put in a professional setting with a specialized tool, the principle of microdermabrasion is the same.
This process has a few beneficial effects. With the stratum corneum (topmost layer of skin) gone, the skin's surface is improved. The healing process brings with it newer skin cells that look and feels smoother. Some of the skin's visible imperfections, like sun damage, blemishes and fine lines are removed. Also, without the stratum corneum acting as a barrier, medicinal creams and lotions are more effective because more of their active ingredients and moisture can find their way down to the lower layers of skin. Microdermabrasion worlds especially well as a way to clean out clogged pores.
If you went to a clinic or salon to get microdermabrasion done, the technician or dermatologist would use a specialized tool for the procedure. The tool shoots a stream of tiny crystals, like aluminum oxide, sodium chloride put sodium bicarbonate, and collects the leftover dead skin cells and used crystals.
There are also newer tools that use a single, diamond-tipped wand on the skin instead of a stream of particles. I have used both systems and I prefer the use of crystals, and have seen better results than with the diamond-tipped wand.
There are some at home treatments available. There is one that I really like, Olay Regenerist Microdermabrasion & Peel System. Its a two part kit and I would notice smoother, softer skin after one treatment. When looking at microdermabrasion kits pay close attention to the size of the crystals. You want a very fine grain. Larger crystals may have rough edges which would leave tiny scratches or cuts on the top layers of skin.
Chemical Peels

There is a big difference between chemical peels done at home, in a spa and in a medical facility.
Peels at a spa can have a chemical strength up to 30%. Any higher strength would have to be done in a medical facility where a doctor is on staff. The most common acids used in peels are lactic, salicylic, glycolic and kojic, or a combination. A chemical peel chemically exfoliates the top layers of skin. The thing I love best about peels is you can customize how strong of an exfoliation you get by the strength of the acid used.

Which chemical peel is best for your skin type/condition?
Lactic acid: An extra gentle peel and good for even the most sensitive skin. Lactic peel with the strength of 30%-50% is beneficial for mature skin and helps to reduce the look of wrinkles.

Salicylic acid: Best for acne prone skin. Not only does it help to control but also prevent acne. I wouldn't recommend this peel for those with sensitive skin as it can be irritating.

Glycolic acid: For those with dull dehydrated skin glycolic is a wonderful peel. Also an ideal treatment for fading sunspots, acne scars and blemishes. Gives your skin a fresh glow. This one is my favorite :)

Kojic acid: You will usually find this one combined with another acid. Kojic acid is a strong skin brightening agent. Improves skin tone, texture and clarity, reductions of acne, clogged pores, shallow wrinkles, fine lines, melasma, and hyper-pigmentation. It also increases collagen and elastin production.
Want to do a chemical peel at home?
I have used many at home peels, although its not the same as getting one from a professional you can still achieve good results.
Clayton Shagal AHA scrub, its a Salicylic acid base. The nice thing about this peel is that it neutralizes itself so you don't have to worry about keeping it on for too long.
Ebay has a lot of chemical peels. Few things to look for when buying something online: NEVER purchase a peel with a higher than 30% strength. Only purchase from a USA seller, and look at their feedback to see what other buyers say about their peels. When you purchase a peel do a test spot behind your ear (skin is thin and more sensitive). Apply peel and leave on for a 3-5 min. if no reaction proceed to do your face.
To apply a peel
1. Cleanse skin 2x
2. Apply either rubbing alcohol or a strong alcohol base toner with cotton balls. The alcohol will remove all surface oils allowing the peel to have better penetration. Allow skin to dry.
3. Apply a thin layer of the chemical peel with either a fan brush or fingers (using gloves). Do not massage into skin ad avoid mouth and eyes.
4. Let sit for 3-5 min. As skin becomes more tolerable you may go up to 7 min. You may feel a slight stinging, itching or burning which is normal. On a scale from 1-10 you should never get to a 7, if you do remove immediately with cold water.
5. Pat with cold water than rinse with cold water until you no longer feel the stinging sensation.
6. Apply moisturizer and sunscreen if done during the day.
For the next 2-3 days you will want to avoid sunbathing, tanning beds and facial waxing as skin may be more sensitive. You may do a peel as often as every 10 days to once a month.
Have any questions? Let me know :)

Thursday, July 7, 2011

Simple summer skirt

 I like simple. Throw summer in the mix and simple is a neccecity. Kids want to run outside and play they want to be their own boss, they want to be comfortable and they want their clothes to be easy. (unless your 2 year old is in a belt phase and insists on adding a belt to every outfit they are not simple) When it comes to sewing I LOVE simple. It's fun to get crazy and make something complex every now and again but simple is king. Todays skirt is a lot like the simple denim skirt I shared a while back.It is the same in that it is denim with a jersey knit waist band but this time I skipped the elastic, and ruffled the denim.
 This allows the skirt to have bounce and movement and no restrictions for little movers. So would you like to make one with me? Let's get started!

 Start with some denim a strip long enough to wrap around your little one twice. Then ruffle it up. I used a light weight denim I took off an old skirt of mine, but you can buy denim or use any fabric you like. Ruffle the top to gather it and hem the bottom the skirt should be whatever the desired length is.
 Then sew the side seam making one large loop. (just ignore the black piece, it just came on the denim that I took off the old skirt.)
 Next let's make a band... of jersey knit. (although a real band would be sweet)I used the bottom half of the tee left from this project. The band should stretch to fit around the waist of the person you are making the skirt for. Stretch comfortably but still be tight enough to stay secure.
 Next you will sew the band folded in half so the side seam is on the inside of the folded band, sew that to the right side of the skirt piece. It gets a little tricky here, I said little, since once you do this once you will realize how easy it can be and do it with ease in the future but if this is your first time you may think it is a little tricky. The band is not the same width of the skirt piece. So you will have to stretch the band as you sew so that they fit together. I pin in place the to sides and the front and back and then stretch to fit in between each point. Then you are done. Easy and simple right?
 The best thing for a skirt loving little summer adventurer.
 The jersey band is super comfortable and easy to slip on and yes it does stay put even without the belt, summer freedom and wardrobe freedom, there is nothing better.

Wednesday, July 6, 2011

Summer Skirt Dress

Remember the skirt series back in the Spring? I shared my favorite dress that looks like a skirt and top, which I called the skirt dress. Well while unpacking I found a skirt I started to make a few years back but never finished. (you know how that goes) I thought I would turn it into another skirt dress. 
 I dug through my "to makeover" tee shirt pile and found a tee that matched perfectly. I put it on and marked where I would want the skirt to start. Then I cut it at the place. (folding it in half helps to make sure you are even on both sides)
 Now for the skirt I made this one more fitted almost like a pencil skirt. To do this I measured the largest part of my hip and the smallest part of my waist. Then I simply made the top fit my waist (with a little wiggle room since I had to get it on somehow) then it tapered down to my hip measurement and went straight down from there. Hem the bottom and you are done with the skirt. 
 With right sides together I attached the shirt to the skirt. I had to stretch the shirt as I sewed it to the skirt. Just make sure to match up side seams and the middle of the front and back. 
 Turn it right side out and you are done. It is as simple as that. I made it in no time at all (especially since the skirt was already done)
 I like to wear a belt at the seam.
That's all there is to it for a super easy summer dress. 

Tuesday, July 5, 2011

Dining Room Reveal


Did you all have a fantastic 4th of July weekend? We loved the 3 day weekend, and all the freedom celebrating, red white and blue coloring, BBQ eating, firework launching, goodness. We also hammered down and knocked out a few projects on our home improvement list. To start we did the dining room. Our 1970's home, was all stuck in the 70's, the dining room and kitchen however, that was brought into the 90's and then left there. (with a very 70's built in hutch) 
 It will never cease to amaze me what fresh paint and hard work will do for you. So 100 dollars spent on paint and painting supplies and the new light fixture, and new curtains and rod (they are the only thing we didn't finish) 
 A new updated, fresh and bright dining room. It may be one of my new favorite places in the house. So want to know my tips and tricks to cabinet transformation?

 Before: I started with this lovely 70's plywood cabinet. The wood was dark and dirty looking. Glass doors on top, dirty brass knobs, sage green walls. 
 After: I used my trusty liquid sander and rubbed down the entire cabinet to get the gloss off. Then prime the cabinet and follow it up with painting. I used a cabinet kitchen and bath enamel paint in Ultra Bright White. 
Here are two tips that I did this go around (our second time refinishing cabinets) 
For the doors to get a really smooth finish I used spray paint. Now a sprayer would be a much better approach however, I was only doing a few doors and we don't have a sprayer so we will rent (or borrow) one when we do the kitchen but I did use spray paint for the doors followed but one coat of the enamel paint. 
For the rest of the cabinet I used a high density foam roller. It's the only way to go in my opinion. It does very light coats so it takes a few extra coats and a little more time, but the finish is smooth and nice. (you could do it for the doors too, but spray paint was faster) 
Since I painted the top of the cabinet as well which is basically a counter top (only it was wood) You have to be careful to let the paint cure. It takes 7 days before you can wash it or get it wet and a full 24 hours of dry time before you can set stuff on it.
We also decided to skip the glass doors up above and just go with open shelves. I liked the doors fine, but the glass caused a glare to always be there so you couldn't see anything on display. So we filled the holes sanded it smooth and put the doors away (incase we ever change our mind) 
 I spray painted the knobs a teal color, and they were good as new. 
 I love how bright the dining room is now, especially since you see it from the front room.
 Now there is a flow from one room to the next. I love making the house our home and making each room a happy and bright place.
Oh and the wall color was Gray Opal from Valspar (same as the living room)
The dining room light is from Ikea
See you back here tomorrow!

Friday, July 1, 2011

Happy 4th of July Weekend!

 Well can you feel it? 4th of July weekend is here! A weekend full of family, BBQ's, fireworks, sparklers, cannons shooting off into the air (if you live in my neighborhood any way) I love everything about the 4th of July it is by far my favorite holiday. This year it provides the coveted 3 day weekend for the hubs and that means in between devouring delicious BBQ and lighting of some fiery sparklers we are going to be going to town on a huge list of DIY home projects. Moving into an old home has it's perks, like the built in wall to wall dining room hutch. Doing away with the yellow toned 70's plywood finish? Yeah that will be a fun project. 
Then there is Abbey's room, before you call child protective services on us you should know this is only what her room looked like for a few days after we moved her bed has been assembled and she is no longer on a mattress on the floor, but yes she still has a sheet plastered up over the window to keep the light out, and nothing decorated about her room. This weekend, this long weekend, things will change in her room for sure. 

So here is wishing you all a weekend full of fun, and if you are like us and tackling many home improvement projects then it is a weekend full of luck to you as well! Share a link with us and we would love to come check out the projects that kept you busy this weekend!