Showing posts with label decor. Show all posts

Thursday, March 15, 2012

Tissue Paper Flowers

So in my church I am in charge of leading a group of girls from the ages 8-11 (sort of like girl scouts but sadly no cookies :) We plan a big party each quarter which is a ton of fun! (I seriously love these girls) So since I am in charge this quarter we are having a craft day (whoop whoop) The girls are all super pumped, and so am I. I am also in charge of all the decorations. Since it is spring time and a craft day I thought what better than to "craft" a bunch of large flowers to use as decorations. I know I know I am not the first person in to ever craft a tissue paper flower, this is not some ground breaking tutorial, this is just how I made these flowers. 
 Which by the way they make great and quick little photo props. (since Abbey saw the growing "garden" of paper flowers and just had to have one.) So here is how I made these.
 You will need floral tape, tissue paper in whatever colors you like, and floral stems. (I just took the tops off some fake flowers I had lying around)
 Then with several layers of the tissue stacked together cut out a petal shape. For the yellow flower I used more pointed petals, but I also made some with very round petals and you can make them in any size.
 Also cut one long strip. This will be the center.
 Using a hot glue gun I put a dab of glue on the end of the stem. Then wrap the strip around the stem. Twist the strip as you wrap it. (like you are making a fabric rosette)
 When you get to the end secure the flap with a dab of glue. See cute little rosebud looking center.
 Next take your petals and pinch them in the bottom. Then add a dab of glue.
 Stick them to the base of the flower spreading them out as you go.
 Continue layering the petals on until they are to the size and fullness you want.
 Next wrap the base of the flower and the step with the floral tape. Thats all there is to it.
 You can layer the colors and sizes of the petals for different looks.
That way each flower has it's own unique look. It's feeling like spring around here with my craft area being overtaken by fluffy tissue paper flowers. I just love it.

Monday, February 20, 2012

Butterfly Specimen Art Pillow

 I finally finished the kids playroom and I am so excited to share how it all came together. So there will be a few posts on that this week. My goals for the playroom were simple. I wanted a fun bright and colorful space that they could play in, create in and learn in. Something created for boys and girls since they would both play in there together and something that could grow with them. So when I was thinking of creating a reading nook of some sort I thought of a couch, or padded area but space is an issue since the room isn't huge. I decided on large pillows that they could cuddle up with and they could easily be used in other ways later. Then I decided to make specimen art pillows which could be educational, and cute at the same time.  So here is how I made this one.
 I used a pillow that was 20X20 inches. Then using simple white cotton I cut out 3 squares that were 21X21 inches. 2 are for the back and 1 is for the front. I also used heavy weight interfacing (the fusible kind) I used interfacing to add stability to the cotton since I would be embroidering and stitching the butterflies on. Then I ironed the interfacing onto the center of the square.
 Next for the butterflies. I made a template by folding paper in half and free hand cutting half a butterfly on the fold. Then I had a symmetrical butterfly as my guide. I also cut out some leaf like shapes in 3 different sizes as well as some small circles. For my butterflies I cut out 6 butterflies in 6 colors I mixed and matched the colors for the small pieces. To the pieces to the butterfly I simply sewed a line through the middle. You can barely see the thread when it is done so I didn't worry about matching it up.
 Then line up the butterflies on the square (the interfacing should be on the back) Rearrange the butterflies until you like the placement then make a small marking to where they are.
 Use a ruler to draw a line marking where each butterfly will be, the ruler can make sure that you have everything lined up even. (oh and I used a disappearing ink pen to make the lines which go away in 24 hours)
 Then sew each butterfly on at the marking by sewing right down the middle.
 Next with the disappearing ink pen I wrote the number above the butterfly and the color below. It worked well with the specimen style as well as being a great educational tool for Abbey with the colors and numbers. Then I used a basic backstitch to embroider the words.
 Then for the back of the pillow I turned under the top edge and stitched it in place. Then fold that edge down again a few inches. (about 5 inches) Do this for both back pieces.
 Then with the fold face down place the other folded piece face down on top. Line them up so that they create a square the size of the front when overlapped.
 Then place the front piece face down and sew around the edges. Clip the corners then turn the pillow case right side out.
 Put the pillow in through the folds in the back.
 That's all there is too it. (I forgot to mention that when I added the embroidery to the words I added the middle of the butterfly and antenna)
Simple fun and cute. They made the perfect addition to the play room and I love the 3D effect of the butterfly wings. Coming up later this week is the version I made for Jude, something cute and perfect for a boy.

Monday, January 16, 2012

Entry Way Labels

 Remember how this summer we bought a new (old) house. Well we are still working our way through project after project. Trying to make each room feel more like us. We have this little entry way. Right when you walk in the front door. Most people who have visited think we should knock down the coat closet to open the entry way up more. I am just not sure what we would do with all the coats and shoes we keep in the closet if we got rid of it. (not to mention all the other stuff we are storing in there) So I am embracing it instead.
 You see it is not a very big area. (never mind the little one who didn't want to leave my side)
 The closet is just so nice to have there, and the living room is really open and bright so it's not like you are walking into a cave.
 So here is the closet, we started by painting it white since it was a lovely shade of 70's orange wood. (if you have seen it you know what I am talking about)
 Then since they kind of reminded me of lockers I thought it would be fun to label them. So I cut out words for Coats...
 And Shoes using the silhouette and some cool faux leather vinyl I found at home depot.
 Then the doors had a little something fun.
While I was at it I made a little Hello Goodbye for the door. I kind of love it.
Sorry no full blown tutorial today, I am working like crazy on some big projects, so they will come...

Thursday, January 12, 2012

A Monogram Plaque

 Do you want to know the worst part about Christmas being over? Taking down the holiday decorations. Christmas is the only holiday (besides a few pumpkins for fall) that I decorate for. Then when it is over and I have to take it all down my shelves and house always look so bare and plain, and I find that it is time for a new look. So over the next little while I will be posting a few decor items here and there until things are finally put together. The first one is the easiest one. You see I was a little spoiled this christmas, and I got the Silhouette Cameo. Let me tell you this machine is everything I hoped for and more. I am in love with it. I love that the machine can do things I always wanted to do but failed, like cutting my own vinyl letters... epic fail, cutting detailed freezer paper stencils... fail. Making my own detailed art pieces... yeah I am just not that good. So I love that I can do those types of projects now (and more) For example I love ornate looking frames. You know all of those swirly details. Well I can never find one like everyone else can at some thrift store for a buck. I can however cut out the shape with the Silhouette, so that's what I did.
 I started with a plain wood plaque I got at the craft store. Any piece of wood would do just fine really. I painted mine white. Then instead of using vinyl I just cut my designs out using a piece of textured card stock. I used a frame I got from the online store from silhouette and then I added a W. Since I like to combine traditional and modern, I went with a modern looking W for the ornate frame. You could of course print out a template and cut out your own design with scissors.
 Then I wanted the paper to have a 3D effect off the wood so I used foam stickies to stick it down.
 Just place a few to secure the corners.
 I did the same for the W
 Then stick them on to the plaque.
 See how they have the raised effect from the wood? I also love the texture on the card stock.
So there you have it a really quick and easy project. Now I just have to get the rest of the shelves ready.

Wednesday, November 30, 2011

Customized Plant Pots

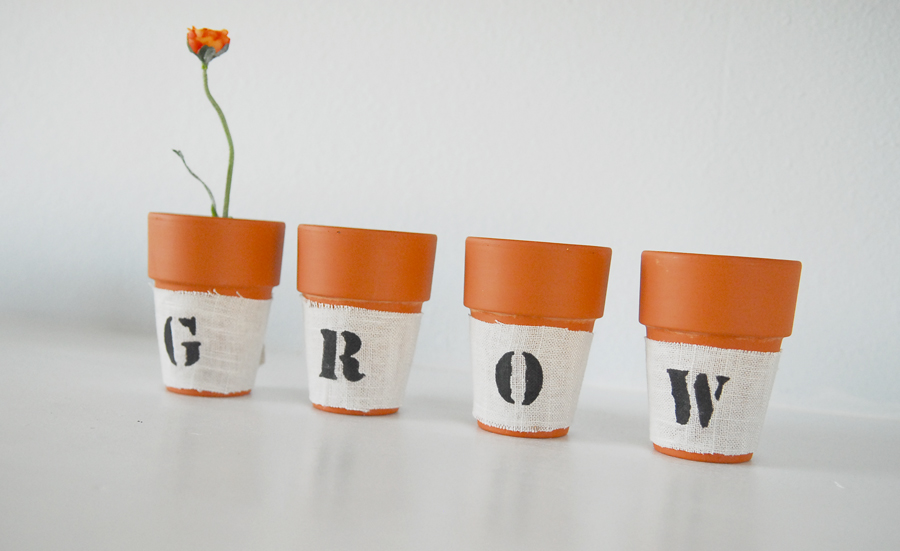
 The first gift of the season is done. As it should be since it was super easy. I will likely be making several more. The perfect gift for the green thumb on your list, or as shown above with just a fake flower it can be a cute decor item. I am so making a set as a gift bundled along with some seeds for a fresh herb garden. The perfect addition to any kitchen window sill that will provide fragrant and yummy herbs.
 I snagged up these clay plant pots at Joanns (or any craft or garden center) they were 75 cents a piece. I like the tan clay color, but you could easily spray paint them to be any color you wanted.
 I also bought a stencil since it is plastic so re-usable and that means I can make them over and over again. Some black acrylic craft paint, and some cream colored linen. You could use any fabric or even burlap if you wanted.
 I cut the linen in strips that would fit around the base of the pot. Then I lined the stencil up in the center of the strip and painted the letter. The paint will bleed through so be sure to paint on top of something. (like a Jo-anns add minus the coupons of course)
 Then when the paint dries (about 30 min) I used a hot glue gun to add a blob in the center of the pot. Then I first glued the letter in place so that it would be nice and even.
 Then pull each side to the back and hot glue in place. Make sure you pull nice and tight so it has a snug fit. Glue both sides and you are done.
 You could spell anything you wanted, like someone's last name, LOVE, HERBS, initials like S+R for a couple, you could easily do anything.
 You can plant a fake flower if you want it to be easy to care for. Just use some tissue paper wadded up in the bottom to center the flower.
That's it. Super easy gift. With tons of possibilities. (there may be more ideas coming :)