We are continuing the the sewing 101 series. I am trying to keep things somewhat basic during this series, while also sharing a few more advanced techniques that still simple to learn and do. (if that makes sense) However most of the lessons are for a technique the actual application is a little more complex, but I am loving the questions and the feedback we are getting so far. We will gladly share more applications of the techniques throughout the series and after the series wraps right now we are just laying the ground work I guess you could say. We will however be sharing a garment tutorial every Friday that will use one or more of the techniques shared during the week, so that may help.
Ok on the today's subject. Pleats! If you have been reading the blog for awhile then you know I am a bit of a pleat lover... yeah likely half of my projects have at least a pleat or two... So if you are at all confused on pleats hopefully this will help.
Pleats are mainly used for creating fullness, or controlling it, depending on how you look at it. There are several types of pleats I will be talking about 4 today.
The first one is the side pleat. It's the basic pleat really every other pleat is just a variation of the side pleat. So plainly put a pleat is a fold. You fold the fabric and then fold the fold over the fabric. Oh confused? Let's start at the beginning...
You have your fabric. With the right side up create a fold so the wrong sides come together.
Then you will take that fold and fold it over the fabric. See how it creates a little flap? Iron that flap to a side and you have a side pleat. Imagine that.
Next up the box pleat. The look so nice and sharp, I tend to put a box pleat in the middle of a row of side pleats. And guess what? A box pleat is made up of two side pleats. One going to the left side and one to the right. Easy.
So start by making one side pleat.
Then make another one going the other direction. You want the back of the pleats to line up and meet in the middle.
There you have it a box pleat.
And if you reverse the box pleat you have an inverted pleat. Oh man am I loosing you with how easy this is? Who says pleats are hard?
Side pleats on the wrong side of the fabric and the split in down the middle on the front. Now for something really cool. You can make an inverted pleat with a separate underlay. (the underlay is the part of the fabric that peaks through the middle opening.)
There are other ways of doing this likely a more "proper" way but this is the easiest way and it is sewing 101 so we will do it the easy way. Sew a strip of fabric connected by two strips of the outer fabric. (outer being the yellow in this case) This should create two seams. Press the seams.
Then you are going to make your inverted pleat so the folds start at the seam.
The outer layer folds should meet in the middle and you should see a peek of the underlay showing through. Cool right? There are so many uses for this. Now let's move on to securing the pleats. You can sew a straight line across the top or secure them in any seam finish. or you can take it further.
With the inverted pleat you can stitch a small rectangle at the top sewing along the edge of the pleat across the center and up the other edge.
This tacks the top of the pleat in place allowing it to shape the pleat and leave the fullness to the bottom. With the inverted pleat it holds the top in place and allows the underlay to peek out at the bottom.
With side pleats or the box pleat you can do a couple different stitches. You can do the partial top stitch, the full edge stitch or the full top stitch. What is the difference? Glad you asked!
The partial top stitch is when you sew along the edge through all the layers part of the way down the pleat. Much like the inverse pleat tack this controls where you have fullness.
The full edge stitch is when you pick up just the fold of the pleat and sew along the edge. You would do this to the front and back fold. This makes the pleats more like individual folds and controls the fullness.
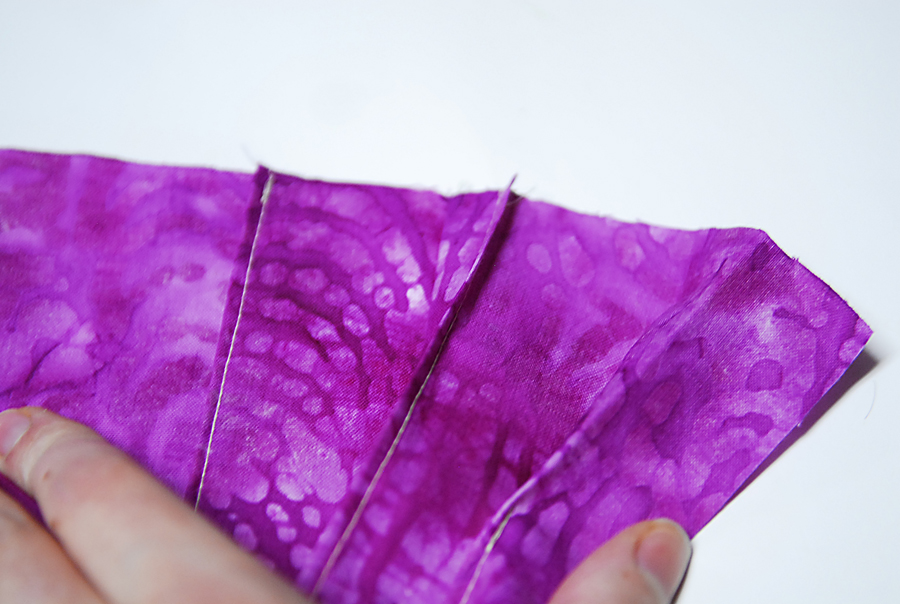
The third on is the full top stitch. This is where you would sew through all the layers along the edge, sewing all the way down the pleat. As you can see this makes the pleat lie completely flat and would remove all fullness.
Here is an example of the three pleat stitches spread out showing the difference in fullness they offer. From left to right, full top stitch, full edge stitch, partial top stitch.
Whew after all of that do you feel like you know the ins and outs of pleats? I hope you love them as much as I do! They add so many great details and I love the alternative to gathering when it comes to creating fullness.


No comments:
Post a Comment