I have been really into making hair bands/belts lately. Why do I call them hair bands/belts? Well my little one wears a hair band off and on. Somedays she is all about them and somedays she wears them for 5 min. So since they are nice and stretchy and her head is seriously about the size of her waist. (so wish that was my case ;) They can double as a belt which is nice since she would other wise have a stash of waisted hair pieces.
Right now I am loving poppies! They are so unique and modern looking, I just love them. Making them out of felt is super easy too. So shall we?
Now I used the heavier felt that you get on the bolt, I think it works better than the stuff you get in the little sheets that is really thin. Then you want to cut 1 larger circle. (however large you want the flower) then cut 1 smaller circle. (slightly smaller than the large one) Next you want to cut out a lopsided bow tie type shape. The more imperfect the shapes the better and more "real" they will look. (great news right?) Then one little small black circle.
Next cut some notches out of the circles. Round the edges of the notches.
Next (very optional) you could use paint if you wanted. I took a lighter and singed the edges. Be VERY careful NOT to start a fire. Just lightly singe the edges. They will melt a little and turn black. (they may also curl up a little)
Then layer the pieces. Big circle, then little circle, then bow, lastly black circle.
I used some black elastic for the band. (nice and stretchy) I sewed the flower to elastic adding a little black pearl button in the middle.
That's it. A cute and simple poppy. I especially love the bold pop of color.
Wednesday, January 18, 2012
Monday, January 16, 2012
Link Party #3
It's time for Link Party #3!
Each week the things you guys link up just get better and better!
Here are a few of my favorites from last week:
Tales of the Scotts shared this really cool idea for Naptime Fun sticks! Something I wish I had thought of when Abbey took morning naps and I fought to keep Jude quiet. Now I just think it would be great to let them have a slew of activities to draw from for play time, it would help mix it up a bit since we often end up doing the same things every day.
Naturally I have to give a shout out to the girl like the sea, who shared her version of the Claire Pattern. I love the print she used and of course it is always fun to see something someone made from a pattern I made.
Last but not least, are these adorable leggings. From Jonathan and Chelsea, she was announcing her new pattern. Not only do I love to support the pattern makers out there, but I love these leggings so much I called my mom right away to have her buy the pattern and she is currently knitting Abbey some in some fun neutrals so they can be worn with everything Abbey owns since I am pretty certain she will wear them everyday. So thanks for sharing! I am so excited for my mom to finish them I can just imagine her needles clicking away....
So are you ready to link up what you made this week? We can't wait to see it!
Each week the things you guys link up just get better and better!
Here are a few of my favorites from last week:
Tales of the Scotts shared this really cool idea for Naptime Fun sticks! Something I wish I had thought of when Abbey took morning naps and I fought to keep Jude quiet. Now I just think it would be great to let them have a slew of activities to draw from for play time, it would help mix it up a bit since we often end up doing the same things every day.
Naturally I have to give a shout out to the girl like the sea, who shared her version of the Claire Pattern. I love the print she used and of course it is always fun to see something someone made from a pattern I made.
Last but not least, are these adorable leggings. From Jonathan and Chelsea, she was announcing her new pattern. Not only do I love to support the pattern makers out there, but I love these leggings so much I called my mom right away to have her buy the pattern and she is currently knitting Abbey some in some fun neutrals so they can be worn with everything Abbey owns since I am pretty certain she will wear them everyday. So thanks for sharing! I am so excited for my mom to finish them I can just imagine her needles clicking away....
So are you ready to link up what you made this week? We can't wait to see it!
New to link parties? That's totally fine here's what you have to do:
Find a entry on your blog that you want to link up.
It can be ANYTHING (unless it's an ad or something let's keep it spam free)
Say it is a great new project you just made and have been dying to share it with the crafting world.
the link should look something like this:
http://(your blog adress/website)/(the post you want to link).html
Linking to the post is the easiest way for people to get back to that post.
Then click where it says "click here to enter"
follow the steps to link your post and create a title, and select your picture.
Keep in mind the picture will be small thumbnail so pick a picture that shows it off the best.
Lastly if you were so kind to add our button to your page or post, or where every you store your link party things that would be super cool. You don't have to use the button to link up, it's just there for you if you can't live without it.
cool? cool. Let's get the party started!
Entry Way Labels
Remember how this summer we bought a new (old) house. Well we are still working our way through project after project. Trying to make each room feel more like us. We have this little entry way. Right when you walk in the front door. Most people who have visited think we should knock down the coat closet to open the entry way up more. I am just not sure what we would do with all the coats and shoes we keep in the closet if we got rid of it. (not to mention all the other stuff we are storing in there) So I am embracing it instead.
You see it is not a very big area. (never mind the little one who didn't want to leave my side)
The closet is just so nice to have there, and the living room is really open and bright so it's not like you are walking into a cave.
So here is the closet, we started by painting it white since it was a lovely shade of 70's orange wood. (if you have seen it you know what I am talking about)
Then since they kind of reminded me of lockers I thought it would be fun to label them. So I cut out words for Coats...
And Shoes using the silhouette and some cool faux leather vinyl I found at home depot.
Then the doors had a little something fun.
While I was at it I made a little Hello Goodbye for the door. I kind of love it.
Sorry no full blown tutorial today, I am working like crazy on some big projects, so they will come...
You see it is not a very big area. (never mind the little one who didn't want to leave my side)
The closet is just so nice to have there, and the living room is really open and bright so it's not like you are walking into a cave.
So here is the closet, we started by painting it white since it was a lovely shade of 70's orange wood. (if you have seen it you know what I am talking about)
Then since they kind of reminded me of lockers I thought it would be fun to label them. So I cut out words for Coats...
And Shoes using the silhouette and some cool faux leather vinyl I found at home depot.
Then the doors had a little something fun.
While I was at it I made a little Hello Goodbye for the door. I kind of love it.
Sorry no full blown tutorial today, I am working like crazy on some big projects, so they will come...
Friday, January 13, 2012
Instagram Friday
Welcome to this week's instagram Friday.
Sharing little tidbits from real life, although It seams as if sewing is all I do in real life, that's only partly true :)
These two have been best friends lately. It makes me happy, it seems like it took forever and they still have times where they fight but for the most part they are the best of friends. (reading a book together)
We woke up to our first snow fall! Yep first snow in January it's crazy pants! It was gone by noon and we are back to a dry warm snow-less winter...It was fun while it lasted
We started potty training Abbey this week. It has to be the most time consuming thing a parent can do. It's been a week and we haven't really gotten anywhere. Jude was a little over 3 before he got it and we started at 18 months working with him on the idea, so maybe Abbey will be 3 too? She just isn't too key on the idea, although she will sit on the potty and read, play with the i-pad or eat cheese nips all day long if I let her, which I have for a few days.
I have been working way late into the evening to get the newest patterns all ready. It will be great to have them done, I may be getting delirious...
We had fun adult time, cards is a favorite past time.
Abbey and her kitty love
Rocky thinks that she can "help" me with my sewing projects.
Do you put needles in your mouth as you sew? If I am sewing I have a needle in my mouth... (or 10) Jude woke up from his nap the other day, and when he saw my mouth full of pins he said "wow momma you have sharp teeth!"
Well when he has a mouth full of Cheetos he has "sharp teeth" too.
So how was your week?
Thursday, January 12, 2012
A Monogram Plaque
Do you want to know the worst part about Christmas being over? Taking down the holiday decorations. Christmas is the only holiday (besides a few pumpkins for fall) that I decorate for. Then when it is over and I have to take it all down my shelves and house always look so bare and plain, and I find that it is time for a new look. So over the next little while I will be posting a few decor items here and there until things are finally put together. The first one is the easiest one. You see I was a little spoiled this christmas, and I got the Silhouette Cameo. Let me tell you this machine is everything I hoped for and more. I am in love with it. I love that the machine can do things I always wanted to do but failed, like cutting my own vinyl letters... epic fail, cutting detailed freezer paper stencils... fail. Making my own detailed art pieces... yeah I am just not that good. So I love that I can do those types of projects now (and more) For example I love ornate looking frames. You know all of those swirly details. Well I can never find one like everyone else can at some thrift store for a buck. I can however cut out the shape with the Silhouette, so that's what I did.
I started with a plain wood plaque I got at the craft store. Any piece of wood would do just fine really. I painted mine white. Then instead of using vinyl I just cut my designs out using a piece of textured card stock. I used a frame I got from the online store from silhouette and then I added a W. Since I like to combine traditional and modern, I went with a modern looking W for the ornate frame. You could of course print out a template and cut out your own design with scissors.
Then I wanted the paper to have a 3D effect off the wood so I used foam stickies to stick it down.
Just place a few to secure the corners.
I did the same for the W
Then stick them on to the plaque.
See how they have the raised effect from the wood? I also love the texture on the card stock.
So there you have it a really quick and easy project. Now I just have to get the rest of the shelves ready.
I started with a plain wood plaque I got at the craft store. Any piece of wood would do just fine really. I painted mine white. Then instead of using vinyl I just cut my designs out using a piece of textured card stock. I used a frame I got from the online store from silhouette and then I added a W. Since I like to combine traditional and modern, I went with a modern looking W for the ornate frame. You could of course print out a template and cut out your own design with scissors.
Then I wanted the paper to have a 3D effect off the wood so I used foam stickies to stick it down.
Just place a few to secure the corners.
I did the same for the W
Then stick them on to the plaque.
See how they have the raised effect from the wood? I also love the texture on the card stock.
So there you have it a really quick and easy project. Now I just have to get the rest of the shelves ready.
Wednesday, January 11, 2012
Twist and Shout skirt
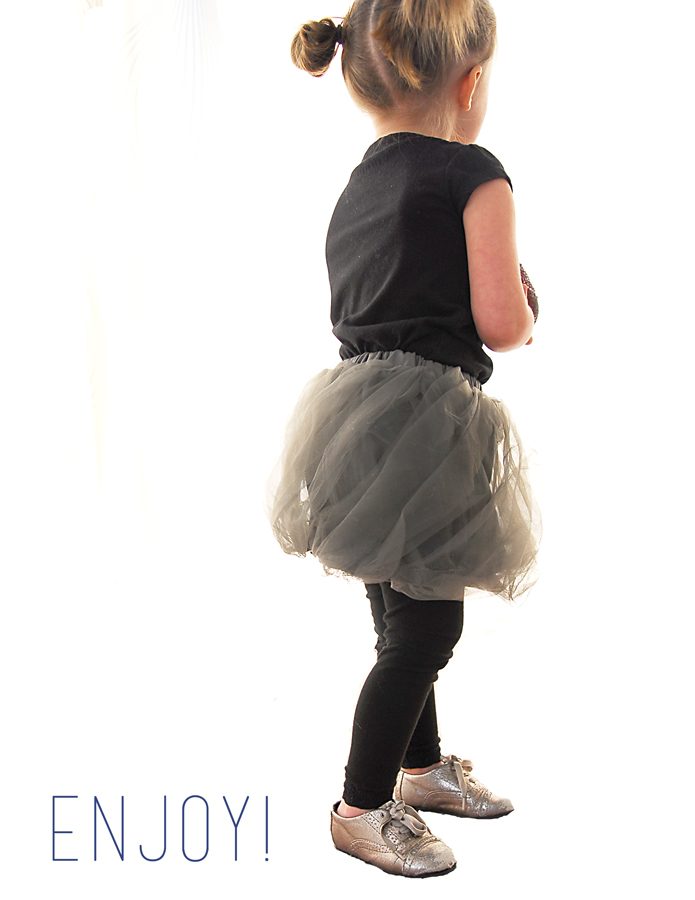
Do you ever make something that you decide is an epic fail and then you shelf it? This skirt is one of those. I found this skirt I love how soft, and flowing it looks. (NOT like mine) I just thought I would try to make one with some tulle I had on hand and well tulle was too stiff. So I thought it was goofy and I put it aside.
Then I found it while cleaning out my supplies and I let Abbey try it on. It is totally not like the one I loved, but I kind of ended up loving the fail. It is an interesting "twist" on a tutu.
What is it actually? A twisted bubble skirt. SO it has some cute flow to it. You could make the same idea with nearly any fabric and have a cute look. So here is the tutorial.
Start with a skirt piece for the front and back. Just make a rectangle that is the length of the skirt you desire, and the width of the Hip measurement plus 1 inch. Cut 2 one front one back.
Then you will want to cut out the outer layer something light weight. I used tulle. I used 3 yards and just cut the 3 yard strip into the height I wanted which is about 3 inches taller than the rectangle base. so 13 inches X 3 yards for me. You could also just double the width of the base for the top layer. It's up to you. Then gather one edge.
Sew the front and back skirt base right sides together at one side to create one long strip. Then sew the gathered edge of the tulle to the skirt base.
Then with right sides together fold the skirt so the base sides and the tulle sides match up. Sew down the side. (this will create a tube)
Now you put the seam on the inside and fold the tulle up so the raw edge of the skirt base and the tulle edge meet up. Gather the top edge of the tulle. Now for a normal bubble you would just match the tulle straight upward with the base.
But instead you want to twist the raw edge so they are off from each other. Twist it over a few inches and then sew the tulle to the base along the top to secure. (I found that using a light steam with the iron helped control the tulle just be careful that you don't burn the tulle)
Next cut out a waistband. Just cut a front and back that are the width of the skirt (plus seam allowance) Then sew them together at the sides.
Fold the band in half width wise and sew it to the skirt. Leave an opening when you sew it so you can add in the elastic then sew the casing shut. Sorry I seem to be missing pictures of that step. If you are a visual person and need help with the waistband step check this skirt post for more details on making a waistband
Last thing I did was a little embellishment. I cut out a long ribbon shape from felt.
Then I pleated it, and stitched a line thought the middle to secure.
Then you are done. With a cute little twisted bubble.
Then again maybe everything looks cute when it is little?
Either way we are keeping it.
Then I found it while cleaning out my supplies and I let Abbey try it on. It is totally not like the one I loved, but I kind of ended up loving the fail. It is an interesting "twist" on a tutu.
What is it actually? A twisted bubble skirt. SO it has some cute flow to it. You could make the same idea with nearly any fabric and have a cute look. So here is the tutorial.
Start with a skirt piece for the front and back. Just make a rectangle that is the length of the skirt you desire, and the width of the Hip measurement plus 1 inch. Cut 2 one front one back.
Then you will want to cut out the outer layer something light weight. I used tulle. I used 3 yards and just cut the 3 yard strip into the height I wanted which is about 3 inches taller than the rectangle base. so 13 inches X 3 yards for me. You could also just double the width of the base for the top layer. It's up to you. Then gather one edge.
Sew the front and back skirt base right sides together at one side to create one long strip. Then sew the gathered edge of the tulle to the skirt base.
Then with right sides together fold the skirt so the base sides and the tulle sides match up. Sew down the side. (this will create a tube)
Now you put the seam on the inside and fold the tulle up so the raw edge of the skirt base and the tulle edge meet up. Gather the top edge of the tulle. Now for a normal bubble you would just match the tulle straight upward with the base.
But instead you want to twist the raw edge so they are off from each other. Twist it over a few inches and then sew the tulle to the base along the top to secure. (I found that using a light steam with the iron helped control the tulle just be careful that you don't burn the tulle)
Next cut out a waistband. Just cut a front and back that are the width of the skirt (plus seam allowance) Then sew them together at the sides.
Fold the band in half width wise and sew it to the skirt. Leave an opening when you sew it so you can add in the elastic then sew the casing shut. Sorry I seem to be missing pictures of that step. If you are a visual person and need help with the waistband step check this skirt post for more details on making a waistband
Last thing I did was a little embellishment. I cut out a long ribbon shape from felt.
Then I pleated it, and stitched a line thought the middle to secure.
Then you are done. With a cute little twisted bubble.
Then again maybe everything looks cute when it is little?
Either way we are keeping it.
Subscribe to:
Posts (Atom)