Tuesday, November 15, 2011

A Special Announcement!


So in my organization weekend, I took the "plunge" and opened up shop over at Big Cartel. Why you ask? Instant downloads of the patterns!! Sweet right? It's good for both of us, saves me time and you get them right away! They get emailed right to your paypal account. 
 You will find all of the Shwin Designs patterns there. Like the Abbey Jacket in both sizes...
 The sweet little miss jacket...
 The Jude Jacket...
And the new "Claire" pattern!
(possibly even one more new one before the new year but we will see)
So an announcement wouldn't be a fun announcement without a deal right???

Well Starting today and running until Christmas You can get 2 patterns for 7 dollars!
Just Enter the code: PENNYLANE at checkout!

So check out the new shop today!

(just as a note if you buy 4 the discount will only come off 2 so if you plan on buying 4 you may want to buy them separately sorry...)

Sunday, November 13, 2011

Adding some warmth to those Tees


So this was a big "organize" weekend. I am a "everything has a place" person (enter my husbands laughter) My husband is a neat freak, so he likes things to just look clean and I like things to be a certain way. Normally it works out fine, and then it seems like everything just needs a gutting and organizing. So I did that over the weekend. It even spilled over onto the blog if you notice the new look, and something else that I will announce tommorow. Another thing I did was gut the kids closets. They have been over flowing with summer clothes and I was getting a little tired of sending Jude back into his room several times to "change into something warmer" I guess he is not as excited about the cooler weather as I am? Well you know what I found when I emptied his room of clothes that don't fit and for warm weather? The poor boy has no clothes. Since the idea of literally buying him a whole new wardrobe seemed over the top, we decided on some ways to make his summer wardrobe (the pieces that still fit) work for winter. So I have a few simple ideas that will be shared the next little while to extend your summer wardrobe. They would totally work for any gender and any size. I might even work in a few for me :) So let's get started today with the easiest. Adding long sleeves to a short sleeve shirt. 

 I started with this shirt. One of Jude's favorite shirts (can't imagine why?) You can grab any short sleeve shirt and you will need some scraps of knit that match, (or look good together) You could also use an old shirt from the scrap pile, or check out the clearance section of stores (old navy is a favorite) and buy an XXL tee in a fun print to use for as many sleeves as you want.
 Fold the knit in half and line it up with the sleeve.I got this knit off Ebay, I used it for a Claire top as well, it was 4 something a yard but then shipping was 5 bucks so it came close to 10 for a yard (yikes!) It was a hard pill to swallow since I am cheap, but I am making the best of it. Tuck the knit into the sleeve. Cut where desired for length.
This is where if I was doing it for one of my shirts I would make the sleeves super long.
 Then with right sides together fold the sleeve and sew up the raw edge.
 Then hem the end of the sleeve. I use a double needle (and apparently thread that doesn't match... I was too lazy to switch when I realized the cuff would be grey not cream) The double needle allows stretch and gives it that "professional" look.
 Then pin the sleeve to the shirt.
 Then I slip the sleeve onto the arm of the machine through the neck opening. and sew the sleeve in place. If you are using thread that matches you could sew along the same line and no one would ever notice.
That's it. BAM! Long sleeve shirt for cool winter style and no need to go out shopping for a whole new wardrobe.


Jude loves his "new" shirt. I think we are both glad this one gets more use :)
And since the kids are a little obsessed with "matching" Abbey was sure to pick her striped Claire top and then hop into the pictures. (Holding hands was her idea and the "cool" dude decided to oblige)

Saturday, November 12, 2011

The "Claire" New PDF Pattern!

 It's finally here!! By finally I mean in "secret" I have been working on this pattern for what feels like forever and it is finally done! The Claire has arrived in the shop! I shared a sneak peek on facebook a little while back, and then I thought it would never be done. Funny thing is it's a really easy pattern to make. In fact the grey and white striped one came together in about 1 hour. (maybe less) Best thing about this pattern. Options! I love patterns with lots of options and this one seems a little endless...
 You can do a peplum top. I love the big ruffled layer and "fitted" second layer.
This one is with the short sleeve, and the cuffs, with some little beaded detail.
 I love the style and the ease. It's being put together without being over the top.
 This one also has a little added pleated detail at the neck. I made some simple layered flowers from fleece by cutting out 3 circles and topping them with some beads.
 Another option is the double ruffle top. Nice and full gathers. Who doesn't love a little fullness?
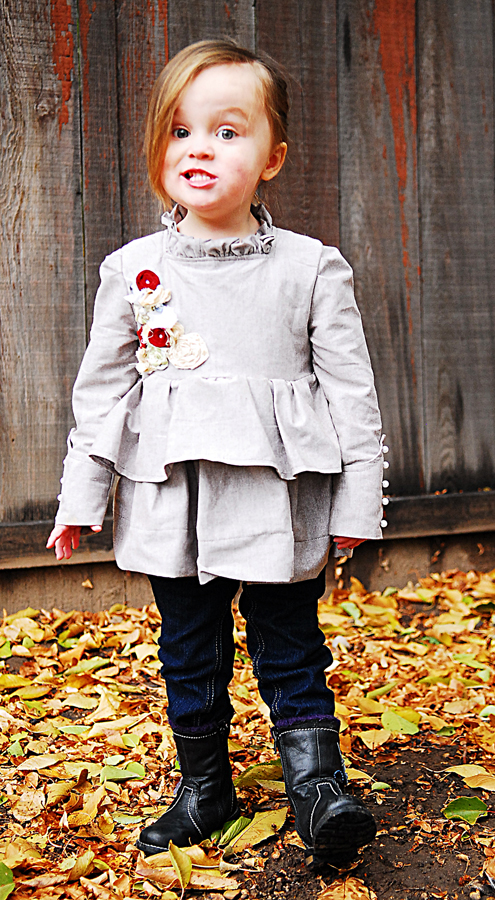
 This one has long sleeves and still has cuffs, this time with little pearls.
 I also added a ruffled detail that goes around the neckline and down the button back. It makes it slightly victorian feeling.
 For casual wear I made one from Jersey knit. I love playing with the stripes and since it was casual I went with the peplum style and no cuffs. Simple clean.
 And I love the little contrast of buttons down the back.
 Lastly is the triple ruffle dress option. A cute and full three tier dress perfect for the holidays. I made this one using silk taffeta so it felt a little fancier.
I love the fullness and the fun layers!

So check it out in the shop!
It is currently available in sizes 6m-4T no promises of going larger in size any time too soon since this one was a bit time consuming to make, but maybe someday. :)


Looking to stock up? We just added Pattern Bundle prices!
Buy 2 patterns for $12  Use the code: BUY2
Buy 3 patterns for $15  Use the code: BUY3
Buy 4 Patterns for $20  Use the code: BUY4
Buy 5 Patterns for $25  Use the code: BUY5

Codes can be used in BigCartel shop only

Friday, November 11, 2011

Photoshop CS5 giveaway!


You know we love our readers! You guys inspire us, motivate us and make this blog so much fun! So to thank you we are offering a giveaway!! What you say? Well since it was so popular last time we are giving away another Photoshop CS5!! (that may have been obvious by the picture and the post tittle... but still surprise!!) 

Why Photoshop? Because it is awesome that's why! Ok more reasons:
1. You can edit pictures
2. You can create blog buttons, backgrounds and graphics
3. You can create printables
4. You can create PDF patterns
5. You can use it to create digital scrapbook pages
6. You can make sewing templates
7. You can make stencils
8. You can make your kids their own coloring pages
9. You can create art
10. You can design your own fabric.

Are those reasons enough?
Last time we gave one away we had some awesome guest bloggers share photoshop tutorials... You can check those out HERE

So if you want to check out more about Photoshop CS5 you can check out the Adobe site. (this is NOT a sponsored giveaway)

Let's get down to the good stuff:

How to enter:

All you have to do is:(as in mandatory)
Be a follower/subscriber to Shwin&Shwin.

Simple right? We love our followers, so become one and you could win!
Just leave a comment letting us know you follow/subscribe to us.
Tell us which project/tutorial has been your favorite
and please please please include your email, it would be tragic if we picked your name and couldn't contact you!

Would you like some extra entires? Those are always fun!
(leave a seperate comment for each entry)
1. Follow us on facebook
2. Follow us on twitter (someday we will tweet more than just FB updates :)
3. Blog/tweet/facebook about the giveaway
4. Upload a picture to our flickr group of a project you made from/ inspired by our tutorials/patterns (we love that)


The fine print:
Ok now for the boring part...We love all of our readers near and far so it is open to anyone. We are trying to get the giveaway going as early as possible since the good people at Adobe can sometimes take a long time to ship the program, so the hope is that it will arrive before Christmas but I can't make a promise on that, but that is the goal :) The giveaway will close on Friday November 18th at midnight MST. A winner will be announced (and emailed) Saturday November 19th Good luck!

Thursday, November 10, 2011

The Motorcycle Jacket!

 Remember how I said I made 4 jackets for Jude? Well I re-mixed the Jude Jacket Pattern to create the Motorcycle jacket. It's the Jude Jacket pattern with a few changes. Like a zipper down the front, and I added a snap flap and ribbing at the waist and cuffs. Simple changes for a totally different look.
 It's all about the top stitching details... it makes the jacket.
 So I started with the Jude Jacket pattern I cut the pattern pieces across the front and back chest in a little bit of a curve. Then when I cut them out of the fabric I added a seam allowance so when everything was sewn back together it was the size as the original pattern. I used a very thin faux sueded cracked leather, and I quilted it to a layer of fleece. Warm and fuzzy on the inside cool on the outside. Then by top stitching I quilted the two layers together in a design I just kind of free handed along the way.
 Then sew the pieces back together like the Jude Jacket pattern was.
 I did the same with the back...
 and the sleeve. (which yes I cut the sleeve pattern as well so it had a "patched" look but really I don't think you have to I think you could just sew a pattern that you like)
 Then I sewed the jacket pieces together following the pattern, I just top stitched all the seams for the added detail.
 Then I measured a rectangle strip of ribbing to go around Jude's wrist. Then I sewed the right sides together. and folded the strip in half so the seam was on the inside. Then I sewed the cuff to the sleeve of the jacket. (need more help on ribbing and how to sew it?)
 Next instead of the buttons down the front I opted for a zipper. Super easy to put in. I used a separated zipper, and sewed it right sides together to the jacket. I sewed one side and the the other, just be sure your two sides line up. (no your eyes are not playing jokes on you that is a grey jacket not brown. I made Jude a grey one too)
 So the jacket could be done right now. You could just hem the bottom and the zipper looks fine down the middle...
 I added some ribbing along the bottom by measuring Jude's waist and then stretching it to fit the jacket. You will also notice I cut out small rectangles that were the same height as the ribbing and then they were sewn to the ribbing. It's just an added detail. Sew the ribbing to the bottom of the jacket.

The last thing I did that for some reason I don't have a picture of... (sorry about that) I made a snap flap for the front. I simple measure the front of the jacket from the bottom of the collar down to the bottom flaps (where the ribbing is) Then I cut a rectangle that was that width (with extra room to turn under the top and bottom) Then I made it wide enough to fold it in half. Then with the raw edge along the zipper I sewed the flap to the right side of the jacket. Then fold it over and top stitch to coved the raw edge. Apply snaps to flap and other side of jacket.
Done.
 Now your little dude has a super cool motorcycle jacket. (please ignore the sleeves being a bit short, the boy had a growth spurt so he is now in a size 5 someone tell him to stop growing please :)
It's that perfect thing for wearing on his "tyke motorcycle" or a tricycle... You know how every your 4 year old rolls around town.


Linking to some of these

Tuesday, November 8, 2011

The Simple Dress

 My daughter needed a dress. Both of my kids have gone through serious growth spurts suddenly and when we got them dressed for church it was truly embarassing. They looked like the most rag-a-muffin bunch with clothes that looked 2 sizes to small. Why do they do this? I swear one day everything fits fine and then next they are popping out of every seam and their pants turn into shorts. So my daughter was in need of some new dressy clothes. Normally I go skirt and shirt but I like the ease of a dress, no matching tops and bottoms just throw one on. There is nothing better than a simple dress. So I whipped up a simple bodice and bubble skirt with pleated details. Simple comfy and easy. I may even make one for myself... if I get around to it. So let's make one shall we?
 Let's start with the bubble skirt. Cut out one band that fits comfortably around the waist and hip. I made mine about 5 inches thick but basically you want it to be quite a bit shorter than the actual skirt length. Then you will cut a rectangle that is wider (about 2 as wide or more) and for the length determine how long you want the skirt to be and the height of both strips together should be twice the length of the skirt. (cause it will be folded...) I hope that made sense...
 Then I cut out a basic bodice front and back, and two sleeves. (need help drafting?) For the back add an inch or so for overlap so that you can put buttons in. I also made the sleeves a slightly longer short sleeve. I made the top bodice out of fleece since I had lots of scraps laying around after making the Abbey Jacket
 Now to make the skirt you will gather one edge of the larger rectangle and sew it to the smaller rectangle (need help gathering?)
 Then with right sides together fold the skirt in half and sew up the side.
 Then fold the skirt so all the seams are on the inside and the raw edges are together at the top. Pleat the larger outer layer to fit the inside smaller skirt. sew the pleats in place. Skirt piece done! (you could just add an elastic waist band and stop here with just a pleated bubble skirt if you wanted)
 for the bodice I started by sewing the front and back pieces together at the shoulders.
 Then I cut out some neck facing and sewed it at the shoulders as well (need help with facing?)Sew the facing to the right side of the neckline. Then turn it around to the back and top stitch in place.
 Then we will sew the sleeves into the arm curves. Like so. (I added some little pleats up at the top.)
 Then with right sides together sew up the sides of the bodice and the sleeves.
 Then sew the bodice to the skirt overlapping the back flaps.
 Then I sewed a rectangle to the right side of the back bodice opening. Then I turned it around to the inside and top stitched in place. I did this to create a thicker layer for the button holes.
 Then sew on buttons and button holes. (need help with the fabric covered buttons?)
 Now the dress could be done, but I wanted to add a simple little bow to the front for an added touch. To so this I took a rectangle and folded it length wise and sewed down the edge.
 Then turn it right side out and center the seam to the middle back.
 Then fold the sides in so that they overlap in the back.
 Then sew to secure.
 Then cut a smaller rectangle and fold in the edges.
 Pinch the folded rectangle and then wrap the small strip around the center. Stitch to secure in the back.
 Then you have a cute little bow. I left the string on the bow so I could sew it to the dress.
 Then sew the bow on and done. A super simple dress with lovely little details.
 Like a sweet little bubble hem and pleated waist.
And I lovet he buttons down the back with a nice little pop of interest.