Tuesday, February 7, 2012

Link Party #6 and a guest post

 It's time to party, link party style! Before we begin the ladies over at icandy homemade are hosting a fun series this week, Pink week! Celebrating all things valentines related. So I made a sweet little love is in the air top.
 Details how to make the actual top with gathered front will come later maybe next week.
So you can pop over and visit us at icandy and then link up for this weeks party!
We are excited to see what you have for us this week!

So are you ready to link up what you made this week? We can't wait to see it!

New to link parties? That's totally fine here's what you have to do:

Find a entry on your blog that you want to link up.
It can be ANYTHING (unless it's an ad or something let's keep it spam free)
Say it is a great new project you just made and have been dying to share it with the crafting world. 
the link should look something like this:
http://(your blog adress/website)/(the post you want to link).html
Linking to the post is the easiest way for people to get back to that post.

Then click where it says "click here to enter" 
follow the steps to link your post and create a title, and select your picture.
Keep in mind the picture will be small thumbnail so pick a picture that shows it off the best. 

Lastly if you were so kind to add our button to your page or post, or where every you store your link party things that would be super cool. You don't have to use the button to link up, it's just there for you if you can't live without it. 

cool? cool. Let's get the party started!


Friday, February 3, 2012

Instagram Friday

Welcome to instagram Friday a glimpse at life beyond sewing and crafting...


 The week started with my "get well" flower being in full bloom. A great way to start the week since the cyst ruptured and I have been well on my way to recovery and off pain meds. (so if you emailed me and never heard back emails suffered the most so I am sorry if you didn't get a response)
 I was able to get out an celebrate an anniversary with the love of my life. Even if our getaway will wait for another day.
 Abbey our little toy player. It's so fun watching her play with toys (animals are her favorites) She was a trooper on a trip to Joann's and found the only toy in the store a tub of farm animals, naturally I had to say yes. Jude never played with toys (excepts cars and trains from time to time) I kind of love watching Abbey play with her little imagination.
 Pepper is our neighborhood watch dog. He is quite good at it too. Nearly any given moment you will find him gazing out the front windows barking at any passing thing.
 Since I was feeling better, and feeling bad for my kids who had to stay house bound with me for 2 weeks we made a stop at the toy store after preschool one day. Do you ever take your kids to the toy store to play? It's my kids favorite thing to do. Sometimes they are lucky and even get an allowance of a couple bucks to pick a treasure to take home.
 Abbey doesn't understand the concept yet so she likes to fill her hands with treasures... And she has a love affair with minnie mouse so a whole aisle of minnie toys was more than she could handle.
 Jude played super heros. His favorite? Captain America... until tomorrow when I sure it will be another one.
 We made mickey mouse valentine cookies... I didn't hear the timer go off and, well they were all inedible, but we had fun making them.
Abbey likes to show me toys and her new thing is wanting me to take a picture of her toys.

So how was your week?

Thursday, February 2, 2012

Paper Bag Pants {Free PDF Pattern}


I have had a bit of a love affair with paper bag style clothing, pants mainly. I would love to wear the comfy pants myself but I am pretty sure my hips don't need the added poof. Abbey on the other hand? They would be super comfortable for any child loose, baggy, stretchy waisted pants. So I made some, I love them and I made a pattern for you. Not a graded pattern, but a pattern, in size 3T, well maybe like a 2T waist and a 3T length? Abbey is kind of between sizes and they fit her like some 2T and some 3T. (link for pattern below)

 The pants are pretty forgiving for the pattern since they are loose and baggy. So if you are making a larger or smaller size you should be able to adjust the height of the waist (front and back) Width (along the straight side) Length in the inseam.

Free Pattern can be found here:
Paper Bag Pants PDF

*Disclaimer*
I use media fire to hold the free patterns, I don't pay for a media fire account just the free account this means they stay free for you and you may have to view a pop up ad, just close it please don't send me an email complaining about the ad. Simply click the green download button and your download should begin. If you have trouble downloading the pattern send me an email at
shwinandshwin@gmail.com
I am more than happy to send out the pattern to you, please be nice in your request (seems silly to even ask such a thing but it happens) It may take me a little time to get it out to you but I do my best.
Ok disclaimer (rant) over with and we can move on to the tutorial.


Few tips before we begin, I used a 3/8 inch seam allowance.
Also the pants can be made with almost any fabric but since they get pleated and sewn at the top waist I reccomend a light weight fabric. I used this really light weight chambray denim. (plain cotton for the facing)
 Start by sewing right sides together, the pocket facing to the front of the pant.
 Then turn the pocket facing to the back of the pant and top stitch.
 Then with RST place the pocket piece down on the pocket facing. Then only sewing through the facing and the pocket sew them together along the edge.
 Now you should have your two front pieces done. Tack the pocket in place to secure along the top edge and side edge. (it makes sewing later easier)
 Next there is not a pattern piece for this but I decided to add faux welt pockets to the back of the pants. There is a tutorial on that here.
 See, cute little faux welt pockets. Totally optional.
 Now for the pants sew a front and back leg right sides together along the straight edge and from the curve of the crotch to the ankle.
 Then with one leg right side out and one leg inside out place the right side out leg into the other and line up the top curved piece. Sew the "U" shape to sew the two legs together.
 Now you have some very large looking pants. (Which seriously for like a size 4 or 5 you could just add and elastic waistband and have a cute pair of pants, just saying)
 Take the facing pieces. (the strips cut from the top part of the pattern) Sew them together at the back and side seams like you did for the pants. That way you should have a large waistband. (if you are using a one sided fabric sew right sides together for all the seams)
 Match up the front and back and match all the seams (sides and front and back) So the facing and the pant waist match up. Then sew them together.
 Press the facing up. Finish the top edge. I serged mine but you can turn it under if you rather. Then fold it down.
 Sew the facing down all around the pants. (you can see the stitch line) Now this part looks kind of messy, but it works. Measure your child from side to side across the front of their waist (or half their waist measurement) That is the size you want the front of the waist to be when you are done pleating. Add pleats across the front of the pant until it is the right size. It may take some adjusting to make sure the pleats stay even. Then sew right through the pleats to secure them all in place. I just followed the stitch line that was already there.
 Next take the piece for the elastic casing and fold both side length wise inward.
 Then sew it in place along the top and bottom leave the sides open. Slide your elastic in place. I used 1/2 inch knit elastic. How much you use will depend on how stretchy your elastic is and how tight you want it, I used about 6 inches. I usually use the rule of thumb that the back should be able to stretch to full size when the elastic is stretched.
 Sew the elastic in place at both ends to secure.
 Then for the front, I don't have the best picture for this but I used some nice and wide ribbon for the front tie. I sewed it in place at both sides. Then I tied it in bow being careful that it was not loose but not pulling the front pieces tight. (you can put it on your child to tie the bow then take it off to sew it in place) I tacked the ribbon and bow in place so it wouldn't come untied. Since if it was going to be anything like shoes they come undone every two seconds and that would just be annoying. Lastly hem  the bottom of the pants. The pattern was made pretty long, so you can hem them to whatever length you need, but keep in mind that wide leg pants look short really fast so keep them a little on the long side or they will be flood worthy in no time.
 Then thats it! Enjoy your new comfy pants.
With super deep pockets for the treasure keeper in your family!

(if you make some pants share them in our flickr group we would love to see them!)

Wednesday, February 1, 2012

The Striped Skirt

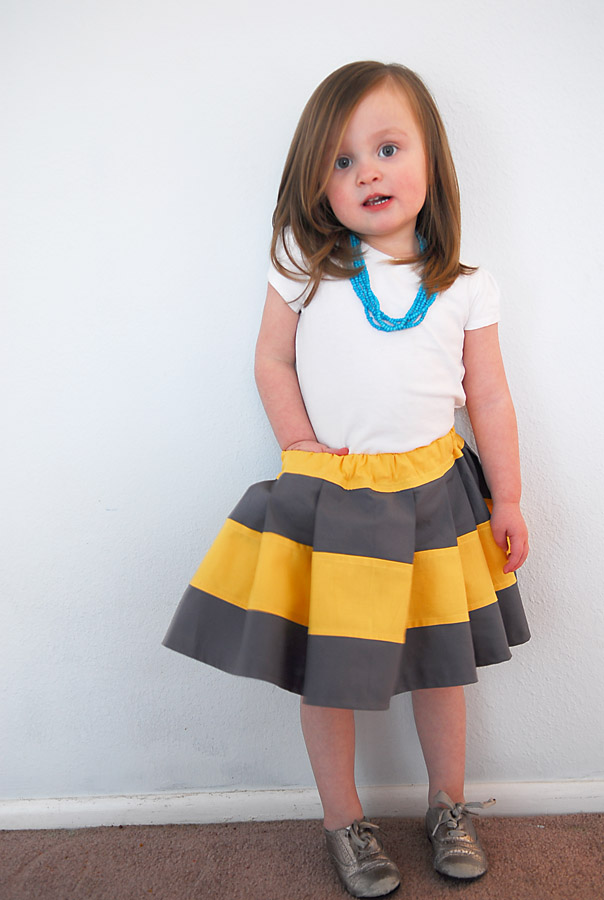
 I bit the bullet recently and made a "huge" investment. I bought a self healing mat and rotary blade cutter. If you have one or have looked into them you know why I say it was a huge investment. Those things are costly. I just figured it was time and like everything else I convince my husband that I need I use it to the fullest potential so money does not go waisted. Hence a skirt I had been dreaming about for awhile was the first project I made with the new set up.
 Beautiful stripes. (yep I have a thing for stripes) I have always had some issues cutting straight and even lines, especially for straight and even stripes. The rotary cutter and straight edge ruler changed all of that for me and the striped skirt was made! Oh and this one was almost a skirt for me, but I discovered I didn't have a zipper and I wanted a fitted waist with a zipper so we will revisit this tutorial in a week or so when I do a grown up version, although you could totally make an elastic version for yourself if you rather. (whew huge long run on sentence)

So to begin select your fabric. I like using two different shades for rotating stripes but you could use the same tone in different shades for an ombre effect. I used quilters cotton (100% cotton) they have a whole rainbow of colors available most places (for around 5 dollars a yard and it's often on sale)Or you could go white and dye it yourself. Now for cutting the stripes. I made all of my 4 inches long and the width is about 30 inches. (they are folded in the picture) Then for the waistband Measure the waist. Divide it in half and then add 2 inches. So Abbey has 20 inch waist so my waist band piece was 10+2= 12 inches. Cut 2 of each stripe and the waistband so you have a front and back.
 Then with the ruler and rotary blade I just angled the ruler and cut all the stripes. This is why if they are folded they get cut the same on both sides. Make sure you do the same for the front and back strips.
 Then with right sides together sew the strips to each other bottom of one to the top of the one below it and so on.
 It's hard to see in the picture but I also pressed the seam and top stitched the seam so they would al lay flat.
 Then when you have all the stripes sewn together you will add large pleats as you pin the skirt to fit the waistband. I started by matching the middle of the skirt piece and the middle of the waistband and then added 2 inch pleats until the skirt piece fit the waistband. Then sew it together.
 Press the seam flat and topstitch. Then repeat all the sewing of the stripes and the waistband until you have a front and back skirt.
 Then with the front and back pieces right sides together sew down the sides.
 Next fold the waistband down half way. (I serged the top edge to finish the edge but you can fold it under twice if you rather)
 Sew all the way around the waist leaving a 2 inch opening then slip in some elastic. (I just put the elastic around her waist and measured what would be a comfortable fit, not too tight so she can grow a little)Sew the elastic in place to secure.  Then sew the opening closed, hem the bottom and you are done.
 Although Abbey has been so spoiled by pockets lately she was sad that I didn't put a pocket in the skirt. You could easily add an inseam pocket (find help here)
 I just love the big pleats that make it a lovely full skirt that still has clean lines.
And the stripes? Yep can't get enough...