Friday, June 28, 2013

10 Summer Ideas to keep kids busy and happy

Summer is in full swing around here and that means one thing around these parts... I hear "I'm BORED!" At least 20 times a day... that is unless of course something super fun and exciting is planned every moment of the day. Hitting the pool each morning is not enough to keep these little minds occupied anymore. So incase you are in the same boat and searching for summer activities to keep the little ones happy, and entertained and possibly even learning a thing or two here are 10 ideas we are pretty fond of. (most we have actually done and LOVE some are still on the to-do list)

1: Painted Garden
2: Kiwi Crates (once a month fun kits!)
3: Exploding Chalk
4:Popsicle Chalk
5:Homemade Sprinkler (the kids love this one)
6:Recycled Jet Packs
7:Sun catchers (lovely and awesome)
8:Paper Parachutes (fun to race)
9: Water noodle games
10: Spatter painting

What are you doing to have fun this summer and keep those little minds happy?

Thursday, June 20, 2013

The Heather Top {New PDF Pattern}

 Well after long last I finished a new pattern! I swear you guys a third kid takes more time alone than the first two together... or maybe it's just because she is a baby and I don't want to miss those sweet smiles, and giggles and general discovery of the world around her so I get distracted more easily. (and tired oh boy am I tired no more late sewing nights for this mama) Anyway I am getting off topic... because I am excited! The Heather Top is done and here with still enough time for summer sewing!
 This sweet and simple tunic which is one of my new favorites is so easy to make, the curved facing detail sings to my soul and just makes me happy to see. In fact if you have followed along here for awhile or sewn a pattern or two you will notice I have quite the infatuation with curved bodice lines. It's a detail I just can't resist and add a little pop of piping like this pattern has and I just get weak in the knees.
The cut is a cute and swingy A-line which is perfect for a comfortable summer top and adds just enough style and shape to not be boring.
 Cute little button straps makes the top (or tunic if you rather) easy to wear which makes kids happy, or at least my kids happy.
 Little pockets are perfect for storing little treasures. This little girl is in love with little toys and figurines (the baby calico critters are her favorites) she loves to stick them in her pockets and bring them everywhere she goes so they can experience the world right along with her, and sing songs in the car with her you know whatever the day may bring. So little pockets are a must for her.
 This tunic was made from a pinstripe linen from Joann Fabric, and a sheer cutout fabric that I backed in white also from Joann Fabric.
 The pattern comes in the sizes 6-9m-8years so naturally I made one for Penny as well. (only I did trim the width just a touch since she is in 6-9m length but 3m width)

It is just as sweet and cute for a little babe. (honey bee floral print from Joann Fabric as well)

You can find the pattern here in the shop

Tuesday, June 18, 2013

Hey June, It's June! Pattern Tour

 Guess what? Today is the kick off of the Hey June! It's June! Tour! What's that? You say, well... The lovely and talented and mighty hilarious Adrianna from Craterhours and Hey June, released another fabulous pattern. You may recall I am a fan of her awesome patterns and have made them Here and Here (and a million more not-blogged but often worn times) Her patterns are awesome, so well written and detailed, I just love them. Her style is always this awesome mix of clean modern looks and vintage feminine charm.
 The Edelweiss is no exception. It's both modern and vintage, and clean and frilly and it can be customized in so many different ways. For this one, I made the top version. (it can also be a dress) I made a size 3T for Abbey since she is pretty thin, and I should have added some length perhaps (I didn't) I wasn't really thinking about it even though the pattern suggests that you think about it since I made a smaller size for her chest, I should have added more length for her height.  For now, it's perfect (especially with shorts) and that's all the matters.
 I also made the pieced bodice version, since it's fun to add a little pop of color or detail so why not. I love the denim and the ruffles and the sweet butterfly print (Hello Pilgrim by Lizzy House which I have been hoarding) I love the way it all came together.
 Abbey loved it too, she was all giddy and happy when I was making it... then she got sick before we photographed it and well, she just stayed sick, so we took the pictures anyway, just with a little less glee. She did ask if she could sleep in the shirt, which means one of two things; one that she was feeling so under the weather that she didn't want to change she just wanted to go to bed, or two that she loved it so much she wanted to wear it forever. I am going to imagine it was the latter, even though it probably wasn't.
So are you in love the the Edelweiss? Who am I kidding of course you love it, and you want one, so here is where to find one
Check out Hey June and follow along over at Crafterhours for more Hey June! It's June pattern tour. (because then you can see everyone else's awesomeness as well)


Monday, June 10, 2013

Bubble Bloomers {Shorts on a line}


Have you guys heard of the shorts on a line series? We are excited to be participating this year! Last year I was all sick and pregnant and likely on bed rest so I was pretty pumped up to be able to participate this year! It happens to be on the same day that the new and improved Honey Pie Bloomers pattern is being released! Yep it's in the shop today! (Along with the Abbey Jacket :)  I thought in honor of the re-release and shorts on the line, I would do a pattern hack. (also you can find a giveaway of the pattern if you follow the series ;) Just saying...

 Abbey was pretty tickled about her new bloomers, because they are "nice and comfy" she was only a little sad they weren't pink... but everything can't be pink, or at least that's what I tell her.
 A few small changes to the pattern and the bloomers became cute little bubble bloomers with big side pockets because this girl is always bringing a slew of little toys with her everywhere she goes.
 So I started by cutting the top off so instead of being high waisted paper bag waist they would have a normal waist, with a waistband (more on that later) Then instead of cutting two I cut it on a fold along the straight edge.
 For the pockets I folded a piece of fabric until I had the size I wanted.
 I stitched some bias tape along the top edge of the pocket piece. Then folded the side edges over.
 Then I stitched the pockets down one on each leg piece.
 I gathered and added the cuffs just like the pattern only I made the cuffs a lot thinner this time so the shorts would be a little shorter.
 Then both legs were sewn together. Now for the waistband, you have options... you can make it the same width of the top of the shorts and use elastic to cinch it in. or...
 I made a waistband that was 2 inches wider that my daughters hip. Then I gathered the top edge before attaching it to the waistband. I only did this so there was a little less bulk at the waistband, but either way is fine really.
 Then I stitched the waistband to the shorts with right sides together, then I folded it down and then in half, and stitched along the edge leaving an opening for the elastic. Slip in the elastic and done.
 Cute little bubble bloomers.
 With giant catch all pockets.
 They were just everything this little girl needed to make her day.


This little girl also happens to be the best big sister. She always volunteers to entertain little Penny, my favorite is when I walk out of the room and come back to find Abbey watching a show or playing a game with Penny telling her all about the ways of life.

This post is part of shorts on the line sewalong hosted by imagine gnats and small + friendly, sponsored by Jo-AnnPretty Prudent/Pellon®, and Hawthorne Threads.

Thursday, June 6, 2013

Summer Breeze Baby Dress {Free PDF Pattern}

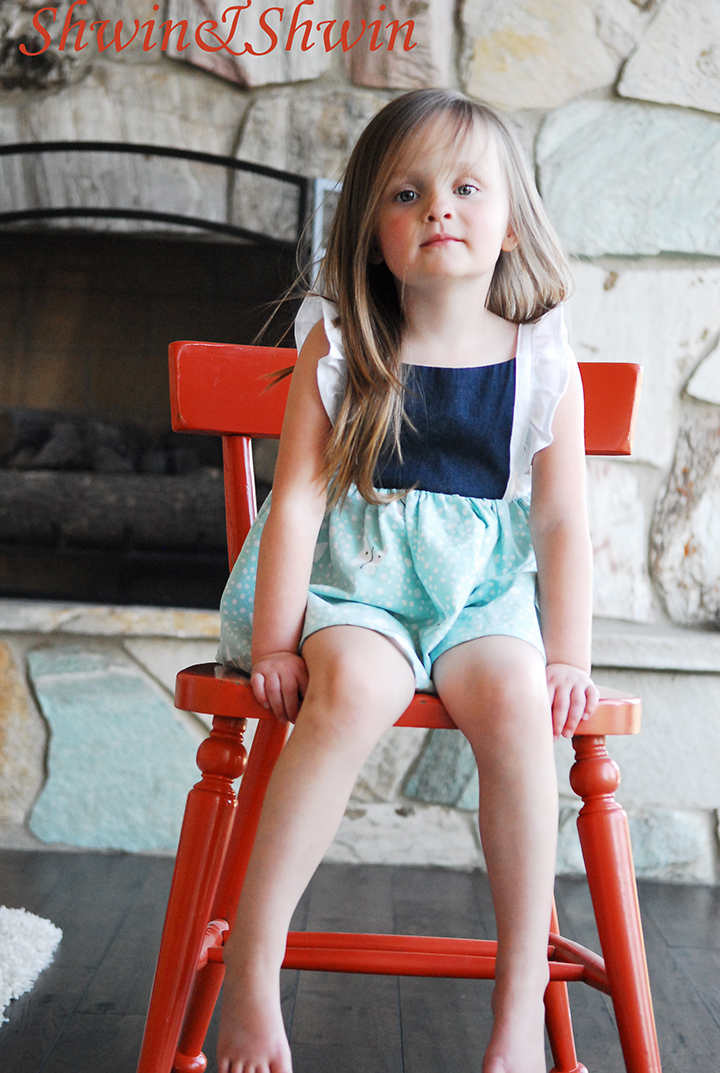
 Oh Hello friends... did you miss me? Life is kind of funny that way. I have just been super busy on lots of fun projects that I forget to stop and share them. Not only that but summer is here! We live outside, seriously, from spending the mornings at the pool and the afternoons at the park, and the evenings in the backyard. Little Penny, who is growing like a weed these days doesn't have much of a summer wardrobe so when I am sewing I am usually whipping up something for her.
 So I made a quick and easy summer dress. Perfect for everyday wear. I have made a few different variations of the dress which I will share over the next little while and a free PDF pattern for you! The size is roughly 3-6m I would say or up to an 18" chest, but if you need it a little bigger simply make the bodice and skirt a little wider and the skirt a little longer and you should be good. (it's a pretty basic pattern)
 To get started you can download the pattern pieces here:
Summer Breeze Dress Pattern
You will also need:
about 1/2 yard of fabric a little more if your print goes one way like mine, (I had to piece the back together)
1/4 yard for lining
2-3 buttons
A onsie (optional I used it for this version)

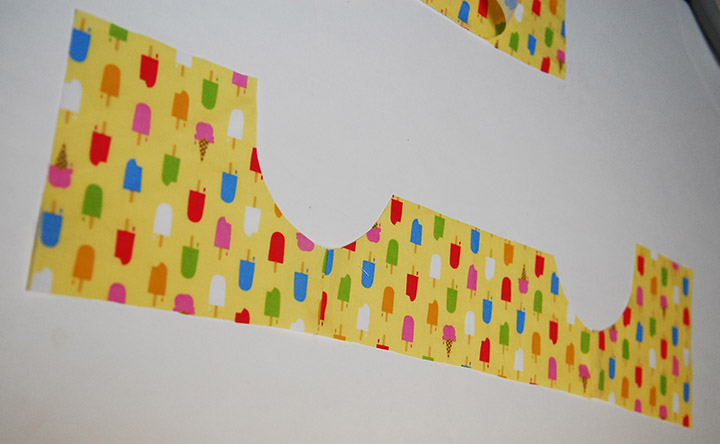
 cut out the pieces should look like so.
 I used a onsie for this style, because I hate when little baby bellies are exposed, the dress can easily be made without a onsie. If you are using a onsie pick a current size or one size up even, and then cut it off under the arms, if your baby is tall cut it up higher and you will have a little added length.
 Then to get started sew the front and back bodice pieces together at the sides.
 Do the same for the lining. Be sure that when right sides are together they match up.
 Then for the straps (which can easily be made longer if you want a little more growing room) Sew two right sides together up along the sides. Then turn it right side out and press.
 Then using the marking on the pattern place the straps between the outer and lining of the back piece. You want the raw edges to match up at the top. Pin in place.
 Now you will sew following the black dotted lines. or basically all the side and top edges except along the top front. Clip the corners and the curves.
 Now pull the strap down from the back piece.
 You are going to put the strap in place along the top front. Again matching up the raw edges. You can pin in place and turn it right side out to check that you didn't twist the strap, but you would notice if you twisted it. Then sew along the top front edge, and clip the corners.
 Now when you turn it right side out you have a nicely finished bodice.
 Line up the back pieces so they over lap and match the width of the front. You can place the buttons and button holes now if you like.
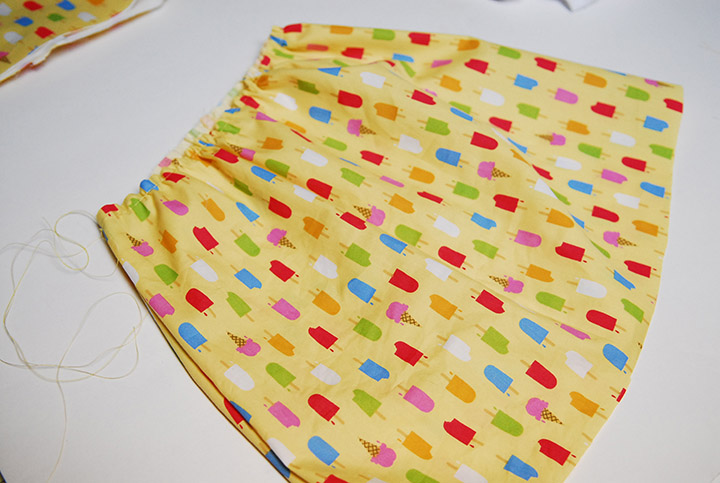
 Now for the skirt pieces place them right sides together and sew up the sides. Then turn it right side out and gather along the top edge. (not a very tight gather)
 Now slide the onsie into the skirt and match up the side seams. You may have to stretch the onsie a little to fit which is totally fine.
 Now so right sides are together sew the bodice to the skirt and onesie. (serge, or zig zag stitch, or finish edge with bias tape)
 Press the seam up and top stitch.
 Hem the bottom of the skirt by turning the bottom edge up twice and sewing in place. Now you have a little dress with a onsie.
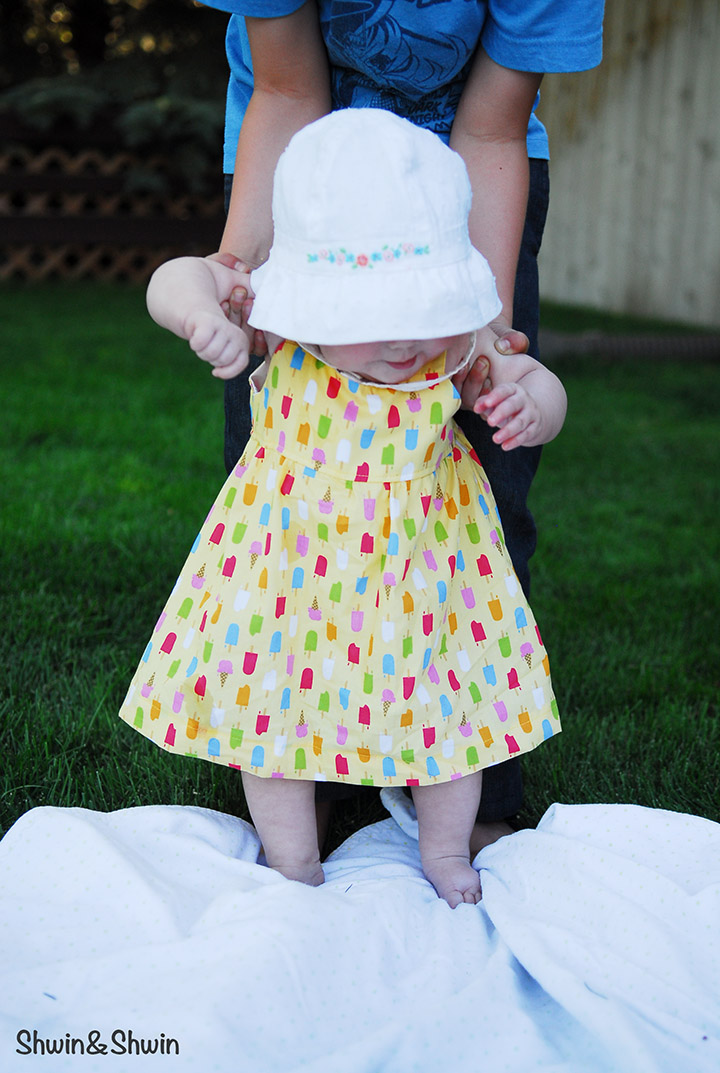
 Perfect for lounging out on a warm summer evening.
 With the onsie there is no need for a diaper cover or anything and little baby bellies are nice and covered.
So there you have it a quick and easy baby dress perfect for summer.
I have a few fun variations coming up!
This one was made with a fun ice cream print by Lisette found at Joann Fabric and Crafts