Friday, November 30, 2012

Guest Posting at Sew Much Ado

 Over at Sew Much Ado, the amazing Abby is hosting a fun series (again) called Flashback Friday! It's a great little series about looking back, a little stroll down memory lane if you will. So hop on over and check out my "flashback Friday"
And the details behind this vintage little denim jumper. See you there!

Thursday, November 29, 2012

Instagram Friday {on Thursday again}

Welcome to instagram Thursday... I promise it's not a new thing, it will return to Fridays, but this week I have a guest post on Friday and thought instead of double posting I would just move this to today. Which is good since I was planning on sharing a free pattern today... but it's not ready yet :) So Monday will be free pattern day! Think Christmas Pajamas! 


 The week started out great! Thanksgiving wrapped up we peacefully enjoyed time as a family, went to go see Wreck it Ralph (super cute) and to get everyone in the mood to set up for Christmas I woke them up with the sweet smell and taste of home made holiday spice doughnuts. They were yummy. (and can be made in less than 20 min, maybe someday I will share my secret)

 Abbey has a new "thing" she does things "by accident" Like brushing her teeth to get ready for bed... it was an accident she actually wanted to stay up longer. Throwing her sandwich to the dog, was an accident, she wanted to finish it so she could get her treat... I kind of love the new phase cause it makes me laugh.
(the dirty mirror does not make me laugh but whatever it is what it is)

 Do you have picky eaters? I have and I am not kidding when I say the worlds pickiest eaters. Abbey? She eats peanut butter toast... and that's about it. She used to eat a few other things but it's come down to toast or nothing lately. Jude? He will eat chicken nuggets, and toast. So we are forcing them to branch out or starve... ok not really starve but the kids need to eat real food and I am little sick of the complaining at every meal so they got to make their own veggie pizzas, (more on those later) Both kids made them, and ate them. It was a small victory.
 Other small victories... I am in the end friends. The "any day now" which likely means any week now, but certainly not more than 3, so I feel like a ticking time bomb. I keep waiting for an energy boost, or the nesting phase to set in... it doesn't seem to be coming. However the big room swap, crib set up and nursery "put-together" is going down this weekend, so that's something.

Ending the week on a high note, Jude was looking through pictures, this one was from the morning we were setting up for Christmas. He brought me my phone and asks, "why am I acting like superman but dressed like spiderman?"

I love that cross superhero boy. (and the girl who is equally amused by his high on sugar doughnuts and Christmas spirt antics)

So that's our week, we will see you back here with a special guest post and Monday with a free pattern!

Wednesday, November 28, 2012

DIY crafting kits

Are you looking for a fun craft to make with your kids this holiday season? My kids love to create things and I love the quick and easy projects. Like this little Elf
Have you checked out The Studio yet? A great site by Kiwi Crate stocked full of crafts to do with your kids, we are even lucky enough to be contributors and it is a blast! I love creating with my kids and seeing them use their creativity to make things they are really proud of. So when the Studio released DIY crafting kits and asked us to try one out, naturally I said yes in a second. Perfect for a gift idea, holiday project, or just something fun to do with your kids. The studio offers kits with everything you need to complete some of the projects from their site.
I mean it comes with EVERYTHING you need to complete the craft. Much like the amazing Kiwi Crates. The little kit we tried out were these fun little elfs. You can get the instructions to make them at home, but if gathering up the supplies is a bit too much for you, simply order a kit and everything you need including the step by step instructions will be delivered right to your door.


My kids loved making the little elfs. The kit came with supplies to make 2 one red and one green so they could easily make their own and there wasn't any fighting or arguing (it was bliss)

You can check out all the kits for sale here

Or simply check out the site to find TONS of great holiday themed crafts, all that come with great instructions for crafting with kids.

You can check out all the projects that we have shared over at The Studio by clicking on the "Kids Crafts" button at the top of the page.


Tuesday, November 27, 2012

Link Party #44

Did you all have a fantastic Thanksgiving weekend? 
I love taking a little down time. So are you ready for this weeks link party? Last week was fantastic as usual, here are some of my favorites:

 Little Pretty Things shared her Sugarplum dress (one of see kate sews newest patterns) I love the mustard and the buffalo check. I have some buffalo check sitting in my stash that has been begging to be used... it may be time :)

 Imagine Gnats shared yet another fantastic quilted stocking. She shared one last week as well, my mom made some stockings right away from the tutorial and then she called me and was sad I didn't share it last week, I agree they are awesome and should be shared.
I'm Feelin Crafty shared these mini quilt magnents, which are think are the perfect little gift for any quilter, or sewing lover on your list. So cute.

So let's see what you have been up to this week!
New to link parties? That's totally fine here's what you have to do:

Find a entry on your blog that you want to link up.
It can be ANYTHING (unless it's an ad or something let's keep it spam free)
Say it is a great new project you just made and have been dying to share it with the crafting world. 
the link should look something like this:
http://(your blog adress/website)/(the post you want to link).html
Linking to the post is the easiest way for people to get back to that post.

Then click where it says "click here to enter" 
follow the steps to link your post and create a title, and select your picture.
Keep in mind the picture will be small thumbnail so pick a picture that shows it off the best. 

Lastly if you were so kind to add our button to your page or post, or where every you store your link party things that would be super cool. You don't have to use the button to link up, it's just there for you if you can't live without it. 

cool? cool. Let's get the party started!


Friday, November 23, 2012

Black Friday Deals!


I am having a Black Friday Sale in the shop! Not only can you save 40% off all patterns today only (ends Friday the 23rd at 11:59 p.m) 
I also released a new pattern! The Lizzy Dress Pattern perfect for the holidays is now available in the shop! (in Big Cartel Shop only)

On Friday the 23rd use the code: BLACKFRIDAY to save 40%
From the 24th-28th use the code: BLACKFRIDAY to save 25%


Use the code Black10  for an extra 10% off 
All Yardage is 6.95/yd. or less
Patterns are 30% off
Solids are only 4.75/yd
*while supplies last**


Sodee Naturals has a November Special!
Also Use the code: CYBER and get 30% off now thru Monday!


You know how we love Kiwi Crate around here. Well they are having a Black Friday Sale! 
Friday: 60% off 1st month of a new subscription
Saturday: 50% off 1st month of a new subscription
Sunday: 40% off 1st month of a new subscription
Monday: 30% off 1st month of a new subscription
Check out Kiwi Crate for more details


Don't forget to check out the Pattern and Fabric Giveaway! $225 of patterns and fabric from Fat Quarter Shop! Check it out HERE to enter!

Fabric and Pattern Giveaway! {$225 dollar giveaway}

6 sewing bloggers-- Shwin & Shwin, Me Sew Crazy, Naptime Crafters, Melly Sews, the Train to Crazy, and see kate sew-- have teamed up with the Fat Quarter Shop to bring you this amazing Black Friday giveaway --- any sewing lover's dream! One lucky winner will win over $225 in patterns and fabric to jumpstart your holiday sewing!! 

Check out all the prizes you'll win below! 


Shwin Designs// 3 patterns of your choice! Featured above: The Claire Top/DressThe Desmond Jacket, The Abbey Jacket

................................
But that's not all! Enter the code 
"BLACKFRIDAY" 
at any of our shops to save!!

40% at Shwin & Shwin today ONLY! 25% off after that
25% at Peek-a-boo Pattern Shop today ONLY!

code good through November 28th at midnight unless otherwise stated
................................

Fat Quarter Shop is also having a HUGE Black Friday/Cyber Monday Sale! The perfect time to stock up on some great fabric! 

a Rafflecopter giveaway

Thursday, November 22, 2012

Happy Thanksgiving {Instagram Thursday}

Welcome to a special edition Instagram Friday {On Thursday} 
Here in the states in Thanksgiving, which means, being thankful, cooking yummy food, eating the yummy food and spending time with family. (there may be some football for the men maybe...) Since tomorrow is going to be full of special deals, sales and giveaways I thought I would have Instagram Friday today. 

We had Thanksgiving yesterday since we celebrate a day early. I spent the day, cooking and loving every moment of it. I nearly cooked myself into labor... but the contractions stopped, which is fine really I have a few more weeks :)

 While I was cooking, I had my "little taster" near by, she requested Finding Nemo on the computer (so she could still be near by) Within no time at all she had the i-pad, and i-touch set up in front of her with a different show on each... technology much? She is a funny girl.

 Jude had a role in the annual children's program at church. He was a perfectly behaved child since we pinned his tie to his shirt this year. Last year he took his tie off and used it as a boom-a-rang... it was an awesome moment.
 I have been working on a pants pattern (one I started oh, 8 months ago) final near complete. Of course right after I sewed this perfect welt pocket with inset flap... I went and sewed the other pocket upside down. It was pretty annoying. Don't you just hate stupid little mistakes?

Jude is our little artist. He loves to color and so every month or so I love to brighten his day with a new pack of crayons. Everyone loves new crayons and a new pack makes this kid so happy, he colors for hours.

So how has you week been?
I hope those of you celebrating Thanksgiving have a great Thanksgiving and we will see you back here tomorrow for some amazing Black Friday Specials!

Tuesday, November 20, 2012

Link Party #43

Welcome to this weeks Link Party! Are those of you who celebrate Thanksgiving all ready for Thanksgiving? We have ours tomorrow, since we figured out a few years ago Thanksgiving on Wednesday is way better than Thursday, and some of our family members have to accommodate both sides of the family so this left Thursday to them while we stay home as a family snuggled in our home eating left overs. It's a good deal. So there won't be a post tomorrow as I cook away in the kitchen all day, but be sure to come here Friday for some deals you won't want to miss... I am talking super pattern sales, new patterns, and giveaways. It's going to be good!

Now on to my favorites from last weeks party:

 Skirt as top shared a tutorial for the fold over doily clutch. One, it's amazing, two she is amazing, and three I just love this, I will be making one as a diaper clutch...
 Eat Sleep Make, Made this cool leather feather necklace. I absolutely love it and since my Shwin counterpart has all the jewelry making talent... I hope she makes me one :)

Sew Very (who I met in real life and is simply lovely) shared the Lovely Rita's she made. Awesome, they are one of my favorite pants :) 
*and as a little note the pattern will soon be re-released going all the way up to size 10! woo hoo!*


So let's see what you have been up to this week!

New to link parties? That's totally fine here's what you have to do:

Find a entry on your blog that you want to link up.
It can be ANYTHING (unless it's an ad or something let's keep it spam free)
Say it is a great new project you just made and have been dying to share it with the crafting world. 
the link should look something like this:
http://(your blog adress/website)/(the post you want to link).html
Linking to the post is the easiest way for people to get back to that post.

Then click where it says "click here to enter" 
follow the steps to link your post and create a title, and select your picture.
Keep in mind the picture will be small thumbnail so pick a picture that shows it off the best. 

Lastly if you were so kind to add our button to your page or post, or where every you store your link party things that would be super cool. You don't have to use the button to link up, it's just there for you if you can't live without it. 

cool? cool. Let's get the party started!


Monday, November 19, 2012

"Hello Little Girl" Tunic {Free PDF Pattern}


I was working on a pattern, I made it for the new baby, loved it, and decided to make it into a full pattern for the shop. Then I made one for Abbey, and it was too big, so I made another one, it was too small... If fairy tales have taught me anything you would think I would have finally made one that was just right...not the case... I gave up crumpled everything up and threw it in the garbage. Dramatic much? These days yes. Anyway I thought it was time for another free pattern so here is the 0-3 month pattern. (shown above) 
I obviously haven't tried it on my little girl as we are still waiting for her arrival, but it was drafted to be 0-3 months (or newborn) 
The directions are pieced together from some of the "attempts" at making my daughter one. So they are not a complete match to the baby one, but I didn't take pictures when I made the first one. (like an idiot) SO hopefully you can follow along ok with these steps. 

Named "hello little girl" (a great Beatles song and what I can't wait to say to a certain little girl in a few weeks) 
The pattern is:
or


 1. Shown are the outer pieces cut out if you choose to "color block" the tunic. To do this cut the pattern at the line and then add seam allowances to the top and bottom piece. Cut them out the same as the pattern directs, just in pieces. For the lined top I cut the lining not color blocked.
2. You are going to start by sewing the top and bottom pieces together to make them whole again.
3. Press them upward and topstitch seam if you like.
4. Next sew the sleeves to the front.
5. Repeat so both sleeves are sewn in place.
6. Then sew the back pieces to the sleeves.
7. Then with the front and back right sides together sew from the sleeve edge to the armpit and down the side. At this point you want to repeat all those steps for the lining as well.
8. Next for the outer layer you will sew the zipper in place. Sew the zipper along the right side of the back piece.


9. Then you will sew the zipper to the other side matching up seams for the color block. 
10. Then with right sides together sew the rest of the back seam from the zipper down. At this point you want to press the edge of the back lining in 1/4 inch on both sides. 
11. Not that the picture shows this very well, but you want the lining and outer pieces to be right sides together. Sew along the neckline to connect both layers. Then turn the pieces right side out. You want the folded edges to be along the inside zipper edges. Top stitch along the zipper edge and neckline. Then sew the lining from below the zipper and down like you did for the outer. 
Did you follow all of that? To finish off the dress. Turn the sleeve edges in and sew. Then turn the bottom edges in and sew. 

12. For the pocket sew right sides together the two layers leaving a small opening. Then turn it right side out and press, stitch opening closed. I added the bow before I sewed the pocket to the dress. To make the bow sew it the same way you sew the pocket. Then simply gather the center and sew it down to the pocket. Then sew the pocket to the dress sewing the edges and bottom in place. 

I hope that made sense... I know it was a pretty random mixed up tutorial, what can I say these days... 


Sunday, November 18, 2012

Living with Dogs (young and old)

This is a Sponsored post written by me on behalf of Comfort Zone® products for SocialSpark. All opinions are 100% mine.

You may have caught my post on cats... and the product we tried out on cats. The same great product is also available for dogs. Comfort Zone® with D.A.P.® which is great because I am dog lover. They just complete our family. When my husband and I got married he said he didn't know if we would ever have a dog. Then after some convincing, he decided maybe someday we would have a dog. Then on a whim of a weekend we fell in love with a friends puppy and found out there was one last puppy left in the litter... so we took him. 

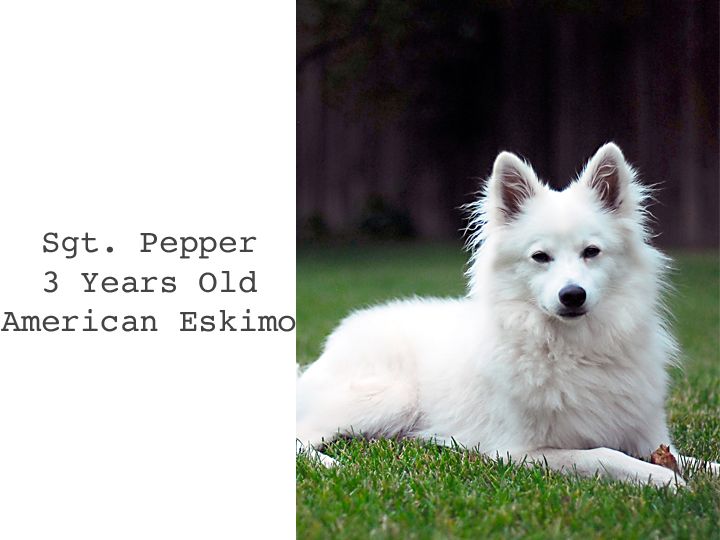
Sgt. Pepper joined our family and we never looked back... Ok that's a lie, the first 6 months was rough. I looked back everyday thinking maybe we made a horrible mistake. Abbey was a baby, Jude was a toddler and I was left puppy training a cute but obnoxious puppy. I wish I had known about this product then.  Comfort Zone® with D.A.P.® helps with the puppy to home transition my mimicking the natural pheromones that help pets feel calm and safe in the new environment. This can help with all the puppy whining, chewing and soiling. Although Pepper did out grow this phase of puppy hood and we survived and love him even more our story continues...

My husband took Pepper into the groomer to get a hair cut and he came home with a new dog... true story. 

Loveable, cute and short little Sampson joined our family this Spring. (don't worry he brought Pepper home too) When he saw Sampson up for adoption he realized that very few people were likely on the market for a 6 year old dog. So he had a soft spot for the dog who had just lost his owner and brought him home. The hard part about introducing an old dog into a new environment for us was making him feel safe and secure. He would guard his food with his life, he was terrified of thunderstorms and lawn mowers, and vacuums, and he was mighty protective of chew toys. This is where the opportunity to try out Comfort Zone® with D.A.P.® really came in handy. We used the plug in unit and plugged it in right over by the dogs food dishes. Within a week we noticed that Sampson was no longer growling, barking or charging at Pepper over the food. (they have their own bowls, but Sampson would guard them both) Sampson seemed much more laid back and both dogs were able to eat without one of us standing between them. 

About 2 weeks into trying out the product we got hit with a big thunderstorm. The Sampson that was jumping up on our bed and whining all night a few weeks earlier was now calm and sleeping peacefully, he didn't seem bothered at all by the storm and we could all sleep well. 

Both dogs are excessive barkers, and we didn't notice any change with the barking. Although they do bark to protect the house (even if they do feel they are protecting us from a kid playing down the street, or a neighbor out working on their garden) 

All in all I would say if you have a dog or puppy with stress related behavior problems, such as barking, whining, soiling, chewing or digging, I think Comfort Zone® with D.A.P.® is worth a try. 

You can also follow along with Comfort Zone® with D.A.P.® on Facebook for more information and to get involved in the conversation!

Visit Sponsor's Site

Thursday, November 15, 2012

A little Bow Blanket {for baby}

 Today was going to be a free pattern for you :) But I lost it. This little mess I call a brain may have deleted it... I have been known. No fear, I will share it later next week instead. So I thought I would share a quick little bow I made for a receiving blanket. I don't know about you but when it comes to these simple flannel blankets, I can never have enough for baby, and I always want new ones. They seem to always take the brunt of messes so by the time the next baby rolls around I am ready for a new batch. However, when I went looking for flannel, I found myself drawn to all the "boy" prints. Bubble gum pink is not the color for me. So when I saw this city print in particular (found at joanns) I knew I just had to make it work. So well I put a bow in it. Bam for a girl now... (right?)
 Without the bow it would make a fine baby boy blanket, Jude actually thinks its gotham city... but with a bow, I say it passes as a girly blanket. You could add a bow to boy blankets you already have on hand if you are handing them down to a girl, or you could add this simple bow to anything... just "put a bow on it" it's going to be a new thing...
 To make the bow I cut out two "bow" shaped pieces. Then I sewed them together all around the edge. I cut a small slit in the middle of the bow through one layer so I could turn it right side out. Also you may note I used pinking shears to trim around the edges so everything would be smooth.
 Then I made the "ribbon" pieces, simply by folding a rectangle in half, making the bottom angle, and sewing the sides and bottom. Clip the corners and turn it right side out.
 Now I have my pieces. I pinched the middle of my bow and tacked it in place. Then I cut out a small little scrap to wrap around the center.
 (picture taken with my phone on this one sorry) So then I laid the ribbon pieces down and stitched them in place along the top. Then I added the bow right on top with the center already wrapped and I stitched the bow in place. I also tacked the bow down in few areas so it wouldn't be flopping all around.
Then to make the blanket I cut to squares (45"X45") and I placed them wrong sides together and serged around the edges. Simple, fast and done.
I did pick up some other flannels as well, they are patiently awaiting their fate... I may just slap some more bows on... or the camera print may get a camera and the woodland print may get a deer (I have a thing for deer but more on that later) Either way, I will be whipping them up soon :)

Oh and just a tip, 1 and 1/4 yards is enough for the blanket, I usually get 1 and 1/2 yards so I have enough to make a matching burp rag, you can never have enough of those either.